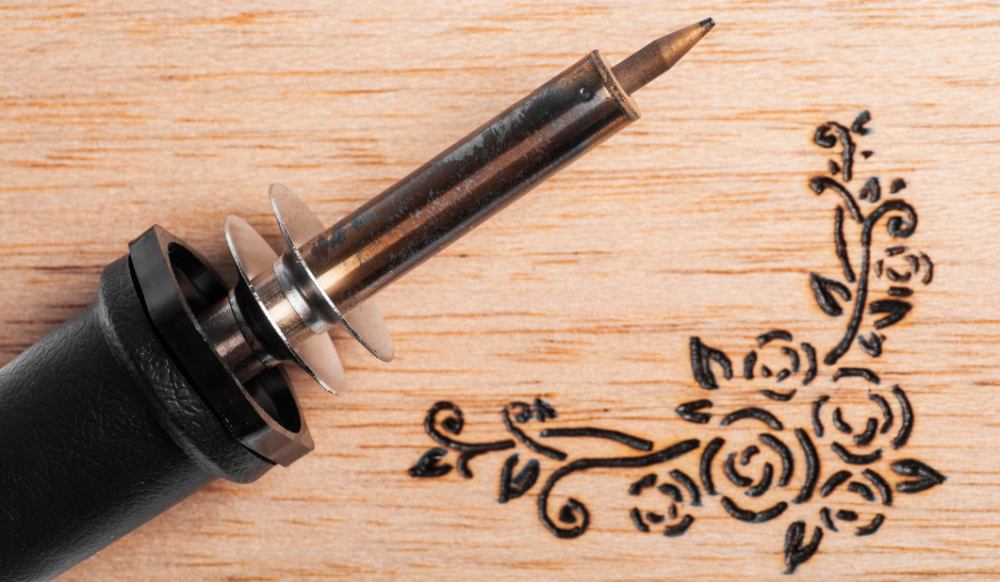
I’ll go through the three key methods of converting a pattern to wood in this blog: stamping, ironing, and tracing. The techniques can be used on almost any graphite-accepting surface, including leather, paper, gourds, and, of course, wood. Each process, like anything else, has its advantages and disadvantages, so allow me to go over each one in detail.
Method 1- Stamping
Will need- light-colored ink and stamp
Brown by Colorbox was the ink used in this demonstration. Although I thought it was a little dark, my only other ink pad is black, and I wasn’t going to buy a lighter coloured ink pad just for this demonstration.
Also, keep in mind that when you use a liquid on wood, it has a proclivity to bleed. To avoid this, make sure your wood is prepared, that you use a piece of wood with a fine grain, and that you don’t over-ink your stamp. The less ink you use, the less likely it will bleed, and if it does bleed, use a light-colored ink so it isn’t as visible.
Finally, make sure the stamping surface is smooth and even. Any areas that are bent, dipped, depressed, lifted, or bumpy will not impress. Since scrapbooking and cardmaking are so common, there are thousands of stamps available. The best places to look are craft shops, scrapbook stores, and online stores.
Steps Involved:
- Prep Wood
- Select Stamp
- Ink with light color
- Stamp wood – hold firmly and press evenly
- Wood burn
You may use multiple stamps to make an image or an accent on a wood frame. You can use a flower or seashell stamp, for example, to create a border around a cutting board, picture frame, or other item.
Method 2- Ironing
You’ll need an iron and a toner-based printer/copier to make the design. This approach does not work for inkjet printers.
Any clothing iron will suffice. Place the picture on the wood with the pattern side up, tape it down in one or two places (making sure the iron doesn’t contact the tape), and then iron over the surface of the paper slowly. To pass the pattern to the wood, steady pressure and heat are all that is needed. After 30 seconds of ironing uniformly and steadily over the page, begin testing the image by slowly peeling the paper back. Put the paper back down and iron again if a portion didn’t translate well. It’s worth noting that if your iron gets hot enough to make the paper brown, it’ll almost certainly turn the wood brown as well.
Steps involved:
- Prep Wood
- Select Image
- Put image face down
- Turn steam off and put iron on cotton setting
- Rub hot iron gently over the image surface
- Let cool a couple of seconds
- Slowly peel back paper
- Repeat until image has transferred properly
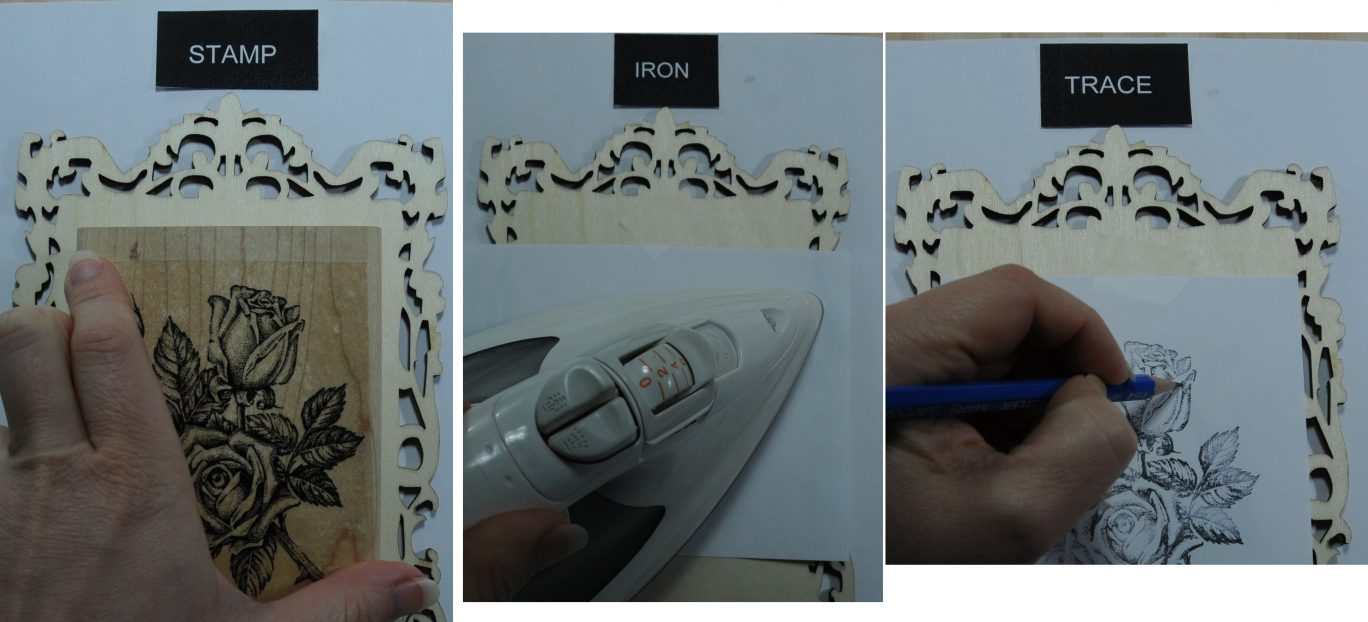
Method 3- Tracing
Pattern on thin paper, wood burning transfer paper or medium (such as graphite), and fine point pen or sharp pencil are all needed.
Carbon paper, graphite paper, charcoal, and graphite pencils are all used for tracing. All you have to do is put the pattern on the wood, tape it down to keep it in place, and then draw the pattern’s outline with a pen or pencil. Slowly peel up the page, checking the pattern as you go, just like you did with the ironing process. Replace the sheet and trace over the empty spot if you made an error.
This is my favourite approach because it allows me to fully monitor what gets transferred and how dark the trace lines are.
Steps involved:
- Prepare the wood
- Place the pattern on a thin piece of paper, such as 20 lb copier paper.
- Using a graphite or charcoal pencil, evenly coat the back of the pattern (or use carbon paper or graphite paper).
- Make a pattern on the wood.
- Place a piece of tape in many locations.
- Using a fine tip pen or a sharp pencil, trace over the pattern with firm pressure.
- Peel back the paper slowly.
- Remove the paper and trace over the region if it didn’t move.
- Remove any remaining pencil lines after burning the pattern.
There are many choices for wood burning transfer tool or medium, including carbon paper, graphite paper, a charcoal pen, or graphite pencils.
Carbon paper- Carbon paper is a form of paper that has a layer of ground pigment added to a thin sheet of paper that has been coated with a waxy material. It’s simple to use: simply place the carbon paper between the pattern and the wood, shiny side facing the wood, and begin tracing your pattern.
- It’s easy to leave out something you don’t want (just don’t trace it).
- Creates a dark image
- Doesn’t need the use of a pencil eraser to remove.
- With a sanding pen, it’s possible to delete.
- When you burn over the waxy binder, it melts and spreads, leaving spots on the wood.
- It takes longer than ironing or stamping.
Charcoal- Charcoal is used to rub over the pattern on the back of the page. This removes the waxy binder from the paper, resulting in homemade “carbon” paper.
- Produces incredibly dark lines.
- Any eraser would suffice.
- Smears quickly – any interaction with it would stain it.
- Polyurethane smeared when I applied it.
- Since the coating easily transfers to other objects, you’ll need to store the pattern somewhere where it won’t move charcoal to other items if you want to use it again.
- It takes longer than ironing or stamping.
Graphite- Graphite is the tool that I use. Place the pattern on the board and begin tracing after coating the back of the paper with the drawing.
- Using an HB or any B range pencil to monitor how dark it gets. (I usually use 3B or 4B.) The higher the number on a B range pencil, the darker the result.)
- Compressed graphite sticks may be used to cover wide areas.
- When tracing, you can press harder to get darker lines.
- Any eraser would suffice.
- It isn’t as prone to smearing as charcoal.
- Quite low-cost.
- It takes longer than ironing or stamping.
Graphite paper- Graphite paper is identical to carbon paper, but it lacks the wax binder that carbon paper contains. Place the graphite paper between the pattern and the wood again, make sure the dull (less dark) side is facing away from the wood, and then trace the pattern.
- Some brands are light and difficult to see.
- Other labels I’ve tried have been so dark that they’re difficult to remove.
- Erases with any eraser; in principle, it’s simple to omit or change a field.
- It’s a medium-priced item.
- It takes longer than ironing or stamping.
Conclusion
In the end, I’ve shown that there are many methods for transferring wood burning transfer patterns to wood. The graphite tracing process is what I use. This method of pattern transfer can be used on any surface that accepts graphite, such as paper, leather, or wood. I prefer the tracing method because it is inexpensive, easy to delete, allows me to choose what to trace, and allows me to monitor how dark the wood burning image transfer is. I can also easily edit the transferred pattern on the wood by erasing spots, pencilling new lines, and so on if I like. It takes a little longer than some of the other methods, but it is the best method for the type of art I like to create. Again, I say this because it helps me to monitor the darkness of the trace lines as well as which parts of the pattern I want to move.
What is the easiest way to transfer a design onto wood?
I knew I had a problem in the middle of a new project I was working on. I couldn’t find out how to move a very big design (think 4 feet by 4 feet!) that I wanted to paint onto a primed piece of wood.
I positioned the printed template on the wood and reasoned that if I traced it on the paper with firm pressure, a small impression line would be left on the wood, which I could then trace. No, that’s not it.
- Print your design and trim away any unwanted white space. Tape the top of your design to the painted or primed wood where you want the design to be transferred.
- Raise the template and place a sheet of newsprint underneath it. Since there is a lot of tiny newsprint all over the page, the classified and stock market pages perform better. Make sure the whole template is covered by newsprint.
- Draw the outline of your template directly onto the paper with a pen or pencil (preferably a pink one with your name on it like you’re six years old). Firmly press down, but don’t go crazy with the strain.
- Peel away the newsprint and taped pattern to show a light transfer underneath! The contrast on this picture has been increased to allow you to see the transition.
- Trace the move directly onto the wood with your pencil (or a paintbrush if you’re way more creative than me).
- Take a moment to admire the elegance of your transfer before getting to work painting!
When you need to move a pattern or stencil a word onto a piece of wood, try this method. I’m sure this will look great on your walls as well. You’ll be surprised by how quickly and easily the style can be transferred.
How do you transfer a drawing onto wood?
Step 1: Supplies
You’ll need the following items:
- A piece of unfinished (raw) wood – lighter woods work best.
- Sandpaper with a coarse grit (60 to 80 G).
- A ruler and a paper cutter or scissors
- Paper for the freezer (much more “printer friendly” than wax paper)
- Make a mirror image of what you want to move and print it out.
- Printer with inkjet technology (DO NOT TRY THIS WITH A LASER PRINTER)
- Apply a clear coat (Lacquer has been used for this project)
Step 2: Choose a piece of wood
A lighter wood is preferable because the ink would show up better. Mine is 5 1/2″ wide by 11″ high.
Step 3: Sand the surface
Rough up the wood’s surface with 60 or 80 grit sandpaper. Don’t go against the grain. If you miss this stage, the ink will not soak into the wood.
Step 4: Cut Freezer Paper
Cut a piece of freezer paper to 8 1/2 x 11 inches with your paper cutter (or scissors and ruler) (or to any size that your printer recognizes). Paper jams are often caused by crooked cuts, so be careful!
Update: Many people have reported success with transparent paper (which is already the right size, feeds through the printer more quickly, and can be wiped clean and reused), as well as the leftover paper from address labels.
How do you transfer pictures to a wood burning tool?
Tracing along a pre-drawn pattern is one of the simplest ways to improve your wood burning (or leather burning) performance easily. Making the pattern by hand, however, can be difficult unless you are a natural artist. You may also want to burn something more difficult to draw, such as a map. You’d probably need to print a patte because you can’t draw it very well.
Preparation
Types of pattern
Patterns with clearly defined lines would be the most efficient. Maps, text, and drawing sketches will all work beautifully. Take a look at the examples below to get a sense of what works well.
This will also work if you are printing big letters. You’ll only trace around the outside of the letters as you trace it. When printing, you may want to just show the outline of the letters to save ink.
Methods of transfer
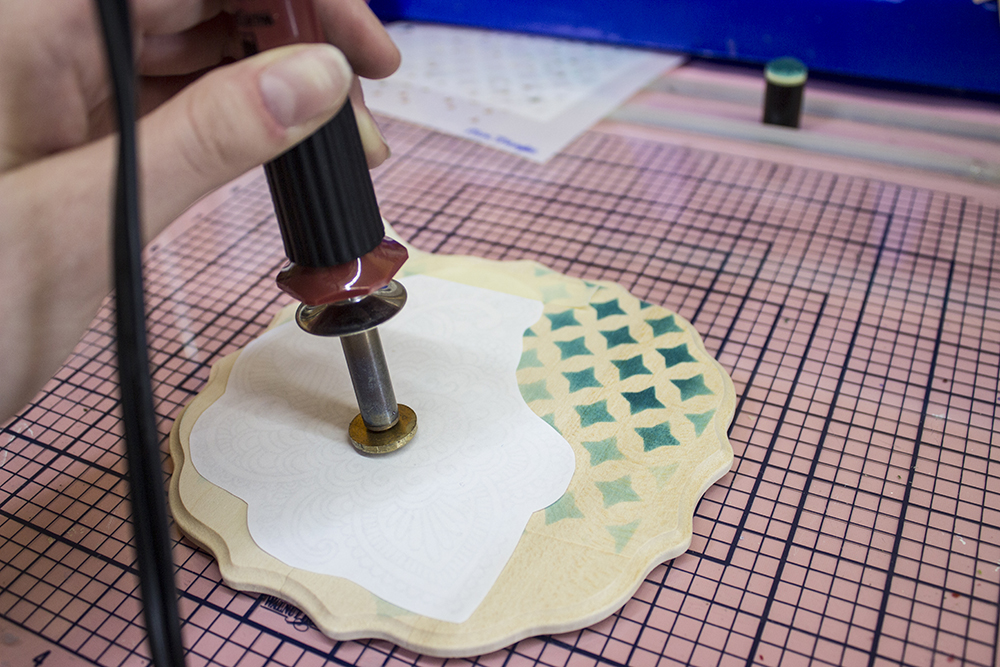
Let me first answer what I believe to be a common issue before moving on to the three methods mentioned below. A ‘transfer tip’ is an attachment that comes with many wood burning through paper. It’s obvious that it’s used for moving stuff around, but how exactly is it used? It works exactly as you’d expect: print your pattern (reversed) on paper, place it ink side down, and rub the backside with the hot wood burning pattern transfer tip before the ink transfers. The only catch is that you must use a laser printer to print the pattern. Unfortunately, many hobbyists are unable to achieve this aim. Laser printers are widely used in offices, but they are seldom used at home. Give it a try if you have access to a laser printer. For anyone else, try one of the three methods mentioned below. These methods, unlike the wood burning transfer tip, only involve an inkjet printer.
Method 1: Printing on a plastic sheet
The first method, and my personal favourite, is to print the pattern onto a slick, non-absorbent material such as plastic. Simply place the printed sheet ink-side down on the surface you wish to transfer it to, rub it in a little, and the ink will transfer. This approach is by far the simplest of the three, and it also produces the clearest lines.
Notice that you can only use this process if you’re printing with an inkjet printer (which is the typical printer type for home use). The heat produced by a laser printer is much higher, and it has the ability to melt the board. Before you start, make sure you know what kind of printer you have.
Making the transfer sheet
It is necessary to print the ink onto an unabsorbent substrate in order for it to move easily. I chose to use a plastic report cover, like the one shown below, because I couldn’t find any ready-made printable sheets of this sort.
Phetronix Clear Report Covers
The cover I used is about 11 inches tall and 17.5 inches wide when unfolded. The final aim is to make it as close to 8.5 x 11 inches as possible in order for it to fit into the printer.
Begin by unfolding the report cover and cutting it in half with an exacto knife or scissors.
Take one of the pieces and determine its width. It was about 8.75 inches tall in my situation.
To bring it down to 8.5 inches, about 1/4 inch had to be removed.
Make a few marks (or a line) and cut it off with an exacto knife or a pair of scissors once you’ve determined how much you need to trim off.
When you’re done, put it in your printer and double-check that it suits.
Printing
When using this approach to make transfers, the image should be written backwards. This is achieved so that it reads in the right orientation when it is turned over during the transition.
Be sure not to touch the ink side of the sheet as it comes out of the printer. The ink has the potential to smudge or stain your clothes.
Transferring the ink
Bring it over to the wood or leather you’d like to pass it to and turn it ink-side down. Then, before lowering it onto the floor, line it up. Keep it tightly in place with your hand until it’s down. On the other hand, press the ink onto the wood with your fingertips or an old gift card.
Lift up the edge while still firmly holding it down to ensure that it has moved properly. If any areas seem to be faint, lower the pressure and rub a little harder in those areas. Simply lift the sheet off until you’re done.
Another great feature of this approach is that it can be reused! Since the ink does not adhere to the paper, you may easily rinse it and reuse it.
Method 2: Tracing with a sharpie
The second approach entails using a sharpie to trace the outline. The excess ink from the sharpie will bleed through and leave traces on the wood as you draw the outline slowly. This approach is time consuming and does not capture fine information well. It does, however, result in a dim, visible outline.
Printing
This approach would necessitate printing the wood burning images onto wood in its natural orientation. It’s easy to print on plain white paper.
Tracing the outline
Place the paper ink-side up on the piece of wood to begin. Place it exactly where you want the final drawing to go, then tape it in place.
Though any sharpie will do, an ultra fine point sharpie will be the most convenient to trace with. You’ll be able to capture the most information on the pattern with the fine point. Here’s where you can find some on Amazon: Sharpies with an ultra fine point
Continue tracing the pattern until you’ve completed it. When you think you’re finished, leave a few pieces of tape on the paper (to hold it in place) and pick it up to check your tracing. You’re finished if it looks fine! If you find any areas that didn’t pass well, lay the paper back down and trace over the problematic areas once more.
Method 3: Soaking with Isopropyl Alcohol
Soaking the ink in isopropyl alcohol is another choice for transferring the template. The alcohol will aid in the’release’ of the ink from the paper and its absorption into the wood. This approach gathers more data and is much faster, but it does not produce very dark lines. This method can only be used when moving to a very light surface.
For this procedure, you’ll need a q-tip and a bottle of isopropyl alcohol.
Printing
The pattern must be printed backwards for this process so that it can be flipped over and shown correctly. This is done so that the ink side is against the wood, making it easier for it to soak in. This can be printed on plain white paper.
Transferring the ink
Tape the printed pattern in place, ink side down, on the piece of wood where you want it.
Dip one end of the q-tip into the alcohol and use it to ‘paint’ the pattern on the page. Apply a small amount of alcohol to the q-tip and rub it in.
You can pick the paper up at times, just as in the other form, to make sure it’s transferring properly.
Carry on in this manner for the rest of the pattern. When you’re finished, pick the document up (while it’s still taped in place) and double-check that everything has transferred correctly. Put the paper back down and rub some more alcohol into any areas that need it.
Final thoughts
When I need to convert a printed wood burning pattern onto a piece of wood or leather, I use the three methods mentioned above. It is entirely up to you which approach you employ. Although the first approach requires some initial setup, it is well worth the time and effort, and I would recommend it whenever possible. Here are some examples of when each approach could be useful:
Capture small details
Plastic Sheet
Isopropyl Alcohol
Make dark lines
Plastic sheet
Sharpie Tracing
How do you make a wood burning stencil?
So, I was looking for a low-cost DIY stencil alternative. It would have been simple if we had used paint, but we wanted to burn the design into the wood. I found metal stencils, but I didn’t want to use them because I only needed a stencil once, and laser cutting metal or something other than paper is costly.
So I looked for materials and came up with a cheaper solution. It could be incorrect, or there could be even less expensive materials that I could have used; if you know of any, please leave a comment below so that others can benefit from your knowledge.
Since we needed large stencils for this project, it isn’t exactly a do-it-yourself project. However, if you have a cricut engine, you can use this approach for smaller tasks.
Materials
- Wood (we used unvarnished OSB )
- Thin double sided tape
- Torch
- Plastic acetate sheet
- 5mm forex (NOT foam board!) (or several 1mm ones)
Step 1: Stencil
1-Cut your template on forex and acetate plastic board.
2-Stick the plastic acetate sheet on top of your forex stencil with double-sided tape. Make sure the tape is applied to all of the borders. The acetate would curl up if not for the flame.
3- Stick your stencil to the wood and make sure it stays there.
Step 2: Start the Fire
Since each torch is different, I recommend getting one with an adjustable tip. Simply inquire around when purchasing your torch and justify your intentions. What exactly are you looking for? to burn your wood quickly and get a dark black result, to burn your wood slowly and get a variety of burnt wood effects, and so on. The sellers will give you the best option based on your desired outcome.
1-This is what it looked like with a low flame, and we were moving very slowly. We increased the heat because we weren’t getting the crispy edges we wanted.
2- Begin by burning the edges. If you want a crisp border, leave 1-2cm between the torch and the wood and fire at a 90-degree angle while moving quickly. You must ensure that the stencil does not melt.
3- Have a stick or something to keep down the stencil; even when taped down, the middle sections of the stencil will raise a little, so having many sticks ready is always a good idea. We also used a block for the larger pieces.
Step 3: 1 Letter at a time
Don’t cover the entire surface; instead, focus on the edges of all the letters or designs.
First, burn the edges, then fill in the rest of the area.
Since we used unvarnished wood, some areas burned more intensely while others remained brown. We liked the impact, so we left it alone. We could have only used black paint if we needed it all black.
Step 4: Cleaning Up
Remove the stencil, but make sure you check around every corner; if you missed anything, you’ll want to find out before removing it.
After that, all you have to do is varnish it and it’s finished. Ok, it’s not that easy, but once you have the right materials, there aren’t that many steps to explain.
Step 5: Final