Can you fill the aluminum rims?
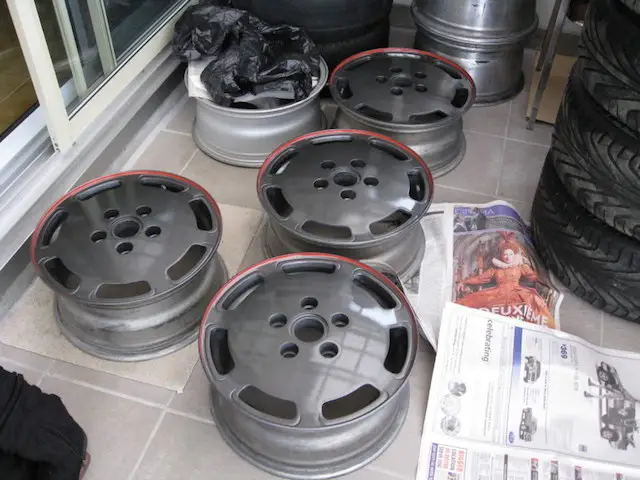
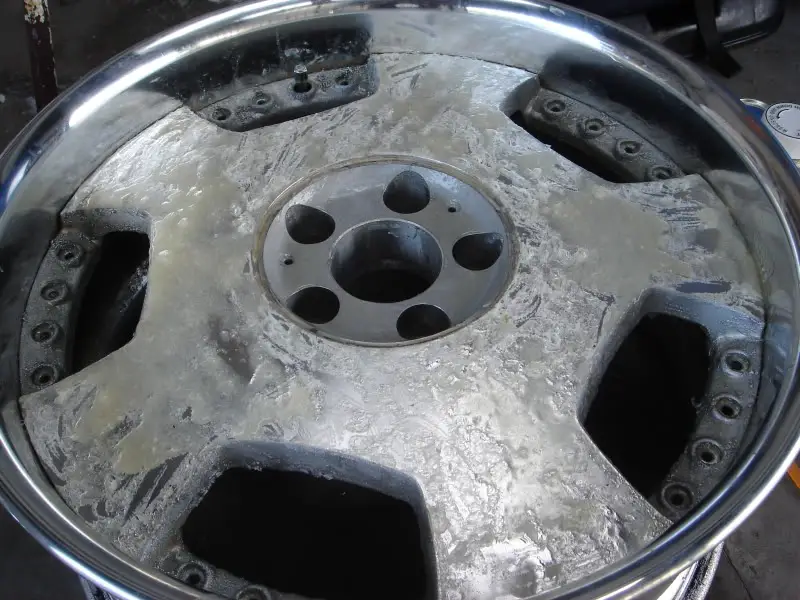
Minor restoration of the alloy wheels where the feathers are wrapped across the lug nut area follows a complete restoration of the same canyon/rim wheel on the right—this photo after removing the factory polyurethane adhesive.

Aluminum Rim Repair
Here’s a custom-made (DIY) rear aluminum alloy wheels that glow in mirror-like light using the famous Jeep Wrangler TJ stock canyon rims, as well as the original aluminum alloy wheels in the 2000 Honda Odyssey.
Detailed steps can be replaced in other aluminum restoration systems in the garage and garage.
You have to stick to horticulture, but I love Michael Likas.
Originally it was painted black by the previous owner because it was so severely damaged. There were holes in many places; I replaced the canyon handle using these methods after the black paint was removed with acetone. It’s set in the background, so some traps are missing.
Although the “valley” rim rims are typical of the Jeep® Wrangler TJ stock, the light gained by this DIY recovery process makes them unique. They will look new, but the canyon alloy wheels will look different in mirror-like light than the mechanical appearance of the aluminum between the speakers – at best, in my opinion.
This distinction can be enhanced, however, by drawing unpolished regions to create a unique combination.
How do you restore corroded aluminum wheels?
Refinishing Aluminum Wheels
Aluminum alloy wheels are made of a combination of aluminum and other metals. Aluminum makes the wheels brighter, stronger, and more durable than most wheels, making the car more precise. They need a little care to maintain their precious glossy preservation. Still, sometimes, even well-maintained tires will need attention to remove dirt and rust from driving on roads covered with asphalt, salt, and other wearables.
Step 1
You need to use a metal brush to remove any dirt and debris that is loose enough to remove the wheels and tires.
Step 2
Clean one tire at a time. Turn on the water and wet the tire and tire. Sprinkle both with a good amount of cleaning for all purposes. Then use a small brush to get into areas that may accumulate dirt. Remove as much dirt as possible right now.
Step 3
Clean the areas inside the nut covers using a tiny brush. If the brush is small enough, use an old toothbrush and another cleaning spray.
Step 4
Clean each area with a hose as you finish it and see if it needs more scrubbing. If so, keep going until the area is clean. It is essential to clean the tire and tire so that the wheel’s dirt does not return.
Step 5
Spray the all-purpose cleaner when working, and be careful not to leave residue on the wheel or wheel. The residue can lead to damage the surface of the tire.
Step 6
Check the tires carefully and find any areas with no indication and a standard cleaning procedure. Spray those areas with an insoluble oil and let them sit for about five minutes.
Step 7
Rub the crushed metal wool over the spots where you spray the oil that goes inside until the rust is gone. Use back and forth movements.
Clean the oil and dry the wheels thoroughly with microfiber cloths. The next day, polish the wheels with an aluminum wipe and spray lightly with a microfiber cloth. Seal with a particular tire wax for extra protection.
How do you get the oxidation off aluminum rims?
All the debris, dirt, minerals, salt, moisture, and dust brakes that accumulate on your alloy rims can make the rims look bad. Fortunately, cleaning the oxidation stains of aluminum alloy rims is done simply.
Refinish Aluminum Wheel
Aluminum wheels naturally incorporate oxidize over time, leaving them vulnerable to contamination and corrosion and requiring good cleaning. Some buildups, such as damaging brake dust, can damage the integrity of your wheels as well.
Cleaning your aluminum wheels, however, is easy. You will need water, an aluminum tire cleaning product, and a soft brush. After collecting the building materials and installing your car before cleaning it, you can get to work to remove local debris and oxidation and finish with polish to give your tires freshly lit.
Install aluminum cleaning wheel on the wheel. Cleaning the acid can create stains on aluminum wheels. Spray the freshly washed tire by using an aluminum cleaner. Make sure to cover all the areas of the tire with a good cleaning.
Painting Aluminium Wheels
Many types of aluminum cleaners and polishes are skin and eye wounds. Wear rubber gloves and protective clothing while cleaning and polishing.
Two standards, acid-free aluminum cleaners include SONAX Wheel Cleaner Full Effect and Proiler’s Pro Series Wheel Cleaner.
Some cleaners may need special procedures to be effective. Always follow the label instructions on the cleaner to get the best results.
1.Drive the entire area of the tire to be very clean. You have to use a soft bristle brush on your wheels, no matter how dirty they are. Use a brush to make soap on the wheel. After cleaning the front side, clean the inner parts of the wheel by reaching the spokes.
2.Strong bristle brushes can create a scratch or blur on the surface of your wheels. These marks can be difficult to polish.
The borders and the inner sides of the lug nuts accumulate harmful dust. Use a small, soft, detailed brush or lug nut brush to clean around and inside their holes.
3.Keep the tire wet while you brush it. And the presence of water will help prevent scratches. Also, a dryer that will dry on the wheel may result in a stained finish.
4.Remove the tire sources. The area of the frame around the wheel is a wheel or fender well. Re-wet the area if necessary. Apply a car wash to the entire surface of the solid brush. Firmly wipe the tire completely.
5.Because the wheel arches’ structure is often stubborn, this car component is designed to be durable and durable. Squeeze the tire thoroughly.
6.Keep your brushes separate. Do not use your stiff brush on your wheels, and you should not use your soft tire brush on springs.
7. Keep the tire wet while you brush it. And the presence of water will prevent scratches and stains.
Clean the tire thoroughly. Use your hose or power washer to clean the soap from all parts of the tire. Start with the wheel properly, as this area may affect the dirt on your wheel while you are bathing. Pay close attention to lug speakers and lug nuts—blown soap coming out of the nut holes.
You have to Dry the cleaned wheels with a microfiber cloth. Allowing your tires to dry in the air can lead to stains. To protect the ends of your wheels, use only a soft microfiber cloth. Keep tire dryers separate from others to prevent damaging brake dust from damaging critical parts of your car.
After you have finished cleaning all your car’s tires, wash your tire dryers separately from other laundry detergents or car cleaners.
Use a clay cleaner to remove the deposited particles when needed. No matter how often you rub your tire with a cleaner, the inserted particles may remain. Use a clay cleaner after cleaning the tire but before it is polished or removed. Although types may vary, in general, the inclusion of clay:
Spray your tire with a clay lubricant. This may come with your clay, or it may need to be purchased mainly.
Shape a quarter of the clay into a small object with your fingers. With moderate light pressure, lubricate the clay over the wheel area. Be careful to apply clay to hard-to-reach areas and dark areas.
Fold the clay as it is dirty so that you can continue removing the particles from the clean parts of the clay.
Use clay grease and a clean, soft microfiber cloth to wipe the clay once the whole tire has been cleaned.
Glossy Aluminum Wheels
The wheels are tied to Poland slightly. Combined aluminum wheels should not have too much oxidation (or). Use only safe coat polish, such as Meguiars Ultimate Polish, on clean, dry, transparent aluminum. You need to follow the directions on the polish, but generally, to polish the assembled wheels:
Apply one wheel at a time with a microfiber cloth.
Wrap the tire with a ball-shaped polishing cord or a clean, soft microfiber cloth.
When the policy dies or is no longer particularly effective, use a new, soft microfiber cloth to wipe the tire.
Remove heavy oxidation before polishing bare aluminum. When your wheels are highly oxidized, you will need to use a pre-cleaner for aluminum polish. Drive oxidized areas where needed. Clean and dry the tire thoroughly before proceeding.
Eliminate excessive discharge and oxidation by hand. Wet the tire with water. With your very hard sandpaper (meager rate), hit the wheel. Clean the tire regularly and keep it moist throughout the process. As the potholes decrease, switch to a good sheet of paper (rated paper). When the pitting is gone, finish with your most crucial sheet.
After depending on the amount of pitting or oxidation on your rims, you may need to apply your sandpaper several times during the process. Striking can require coarser sandpaper, such as 320-grit.
The power polisher will pierce the wheels smoothly and very quickly.
Carry aluminum wheel polish on a clean and dry wheel. Use an applicator, a small soft, clean microfiber cloth, or a wool polish pad to apply the polish to the wheel. Apply enough polisher to the entire wheel or the amount specified in the instructions.
Use a power polisher, if available. Activate the polish by moving slowly and spreading the polish on the surface of the wheel. After the polish has spread evenly, it gradually increases the polisher speed to 2000 RPM.
While polishing, keep all the pads moving across the wheel. When the polish starts to dry out or fade, wipe the tire surface with a clean microfiber towel.
This process can also be done manually. Cool the Buff on the wheels with a polishing pad. Hand polishing can take a lot of time and effort.
Some polishes can have many layers, such as those with regular polish and finishing polish. Apply second agents in the same way as regular polish, but use a clean pad.
Wipe the remaining polisher with a clean microfiber cloth. At this stage, your tire should look new. After polishing each time, wipe the tire with a clean, soft microfiber cloth.
For multi-stage polishes that use a fine or thinner polish, re-polish the tire with a finishing polish.
are planning to re-polish, be sure to use new pads and fabrics. Dirty or dirty polish can transfer to your wheel or cause scratches.
Clean and polish the remaining wheels this way. Now that your tire has been cleaned and polished repeat this process on your remaining wheels. To prevent further oxidation, apply wheel wax to the wheel according to the label guidelines.
Wheel wax can be purchased at most private and hardware stores and in many general retailers’ automotive sections. The use of wax will prevent contamination and break up dust in the building.
Can aluminum wheels be sandblasted?
The traditional method of blasting aluminum surfaces is to dry the cracks and then cool the surface. After this, the area can be painted or painted. This applies to large areas such as a car or a boat. External blasting is usually done with a sandblaster in a pressure pot.
There are many reasons you may want to make aluminum sandblast wheels.
Some of you may want to remove the factory paint or start over. Perhaps you wish to remove rust or dirt. Maybe you will repaint or paint wearing tires. You may want to go down to the surface of the metal and polish the wheels.
This guide will help you successfully explode aluminum structures of all kinds.
How it works
The traditional method of blasting aluminum surfaces is to dry the cracks and then cool the surface. After this, the area can be painted or painted. This applies to large areas such as a car or a boat. External blasting is usually done with a sandblaster in a pressure pot.
For smaller items, such as aluminum wheels, rims, or parts, a more efficient method is now available.
Using a vapor barrier cabinet or an explosive cabinet, the blasting time is significantly reduced, and the polishing step is wholly removed. The advantage of the wet explosion is that it does not produce dust. With a slurry cupboard, the media and water are mixed and then exploded at the top. With our Vapor King, we have combined the ability to blow pressure directly with a liquid blast. These options make the acceleration of the area much faster than the old dry method and polishing method.
Wet Blasting Aluminum vs. Dry Blasting Aluminum
The most significant advantage of wet aluminum wheels and space available is that the preparation time is much shorter than dry blasting. On the contrary, the most significant disadvantage with wet blasting is that you will need to wear a blast area faster than a dry blast. The wet explosion removes most of the embedded media particles you get from the dry explosion, but painting or coating should be done immediately to eliminate any contact.
Selecting Right Blast Media
If you are blasting the aluminum area, the most commonly used scratch media is glass beads, sodium bicarbonate, or walnut shells.
The shooting of metal or metal should be avoided. Steel is heavier than aluminum and can create a higher profile, leading to cracking.
If you remove aluminum wheels to apply paint or powder coating, aluminum oxide or crushed glass are good choices. This will leave an anchor profile, which will allow the new cover to adhere to the aluminum substrate.
If the goal is to replace the aluminum to achieve a polished look, glass beads or soda will be your best choice. If you stop the explosion, you may need to polish the surface after the explosion.
Sandblasting Pressure of Aluminum Areas
Some aluminum panels have smaller panels than other materials. To avoid tension during an intense explosion, start with external pressure, 50 to 60 PSI, and then rise as needed. With contained explosives, as in a blasting cabinet, the cabinet’s size and the blast pipe will affect how much PSI you need to use.
The larger the blower pipe, the more air pressure you will need to blow it successfully. You can find a helpful reference chart for the recommended CFM here.
Check out the Small Face Segment First
Start by exploring the part of the blast area. If the air pressure and the effects look good, feel free to blow up the rest of the area, claiming the same conditions.
Depending on the type of aluminum you will blast and how often you should use different equipment types. In large parts, such as the outside of a car or a boat, the sand of an outdoor pressure bottle can fit perfectly. For things like rims or wheels, a dry blower cabinet or a sliding closet is a great choice.
How To Remove Corrosion From Aluminum Wheels
Before and after the restoration, images are part of the alloy wheels where the feathers are wrapped across the lug nut area, followed by a complete restoration of the same wheel/rim wheels of the same canyon on the right—pre-image after stripping polyurethane adhesive factory.
Here’s how to make a DIY recycling aluminum road wheels. Detailed steps can be replaced in other aluminum restoration systems in the garage and garage.
Originally it was painted black by the previous owner because it was severely damaged. There were holes in many places; I replaced the canyon’s whole Rim using these methods after the black paint was removed with acetone. It is set in the background, so some traps are missing.
Although “valley” rims are common stock of the Jeep® Wrangler TJ stock, the light gained by this DIY recovery process makes them unique. This distinction can be enhanced, however, by drawing unpolished regions to create a unique combination.
What do you think? And let me know which methods you find most effective, and I will review them.
I am editing the video if there is interest. Many helpful YouTube® videos show the removal of polyurethane fabric with alloy wheels with a stripper and bending sanding or polishing aluminum in various ways. But there is nothing this perfect with peanut soup I can get.
Refinish Rim
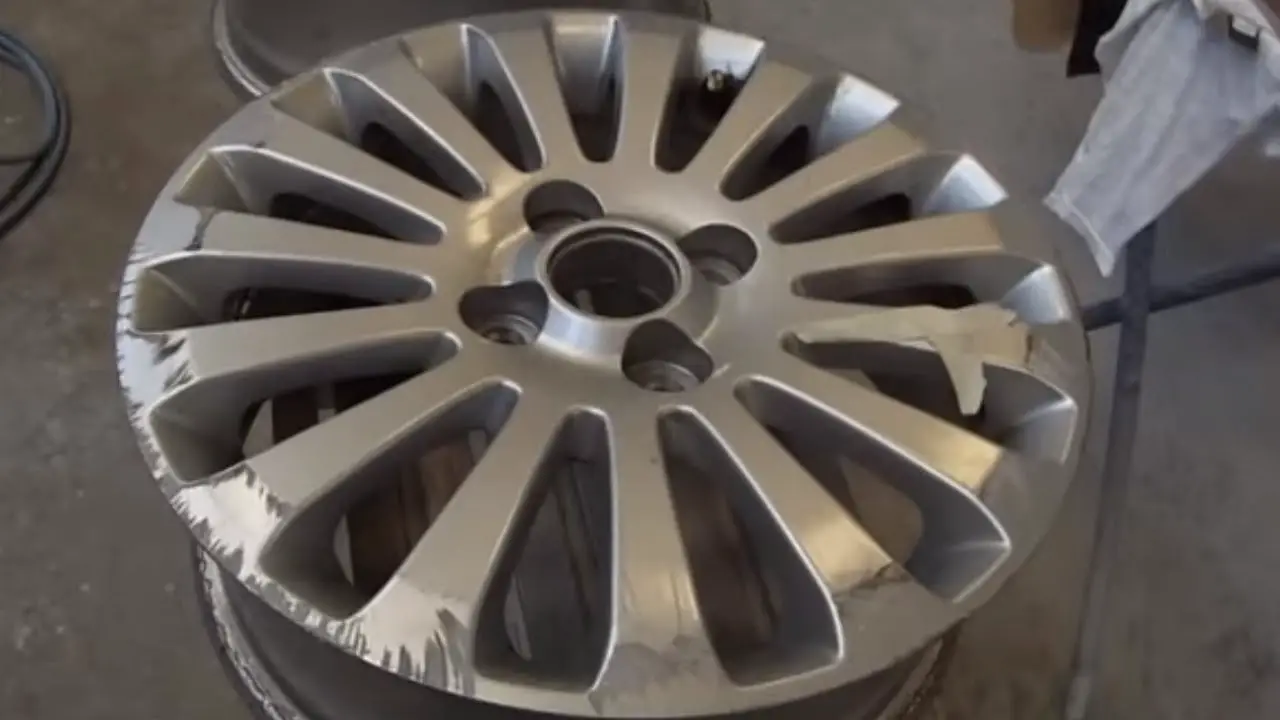
Aside from the many promises out there, I haven’t found any quick fixes to replace scratched, folded, and aluminum badly damaged parts. I am discussing one of them at the end of this post. However, you can Refinish Rim
new with a mirror-like finish by simply sanding them with a cheap sander-polisher at low speed along the thinner material’s edge and polishing them with aluminum metal polish.
Then put them on crystal-clear or keep them polished and waxed. Each wheel takes several hours with some effort – the effort makes it much easier with the right electrical tools.
You may already have many tools and building materials to Refinish Rim, but I also researched the most expensive tools and materials efficiently on Amazon.com®, most on a two-day post. Let me know when you get the best.
Here are the top steps:
This will be followed by a specific description and then the same outline with all the details, lessons learned, and the best practices I have learned to help you do DIY for the first time.
The entire edge of the canyon restored – with 150 stone sand between the polished speakers – is protected with wax.
Advanced Steps:
Adjust the working surface and alloy wheel
Clean / degrease
Remove the clear polyurethane coating and any paint from all over the tire.
Sand, as needed, inside lug-nut holes
Soil between spokes
Sand center, spokes, and line with low-speed sander-polisher and a full range of grits
Aluminum polish and shine
It can be wax or de-wax / degrease & coat with clear crystal paint.
Self-disclosure:
I am not an automated industry expert. On the other hand, if I can do it without previous experience with arthritis in my shoulders and elbows, you can too. Apply these steps/ideas by putting yourself at risk, both from a personal point of view and from a medical point of view. Wear old clothes that you would not worry about. Make sure you follow all the label labels of the manufacturer whether I do/do or not. Knee, sitting and kneeling pad, and knee pads are helpful. I have tried to think of everything, but you will need your common understanding and practical knowledge of working with cars, tires, jugs, electrical tools, and more.
Aluminum Wheel Restoration
Each tire takes a few hours and costs some sandpaper, tools, and other items you don’t have. A complete list of recommended items for Aluminum Wheel Restoration is on the edge of the items you do not have.
Don’t worry too much about the suitable Aluminum Wheel Restoration
. I am a 5 ‘9’ 163-pound 50-something man with arthritis in my shoulders, elbows, knees, etc. I got treatment – I feel better in the next few days than after a very long duration.
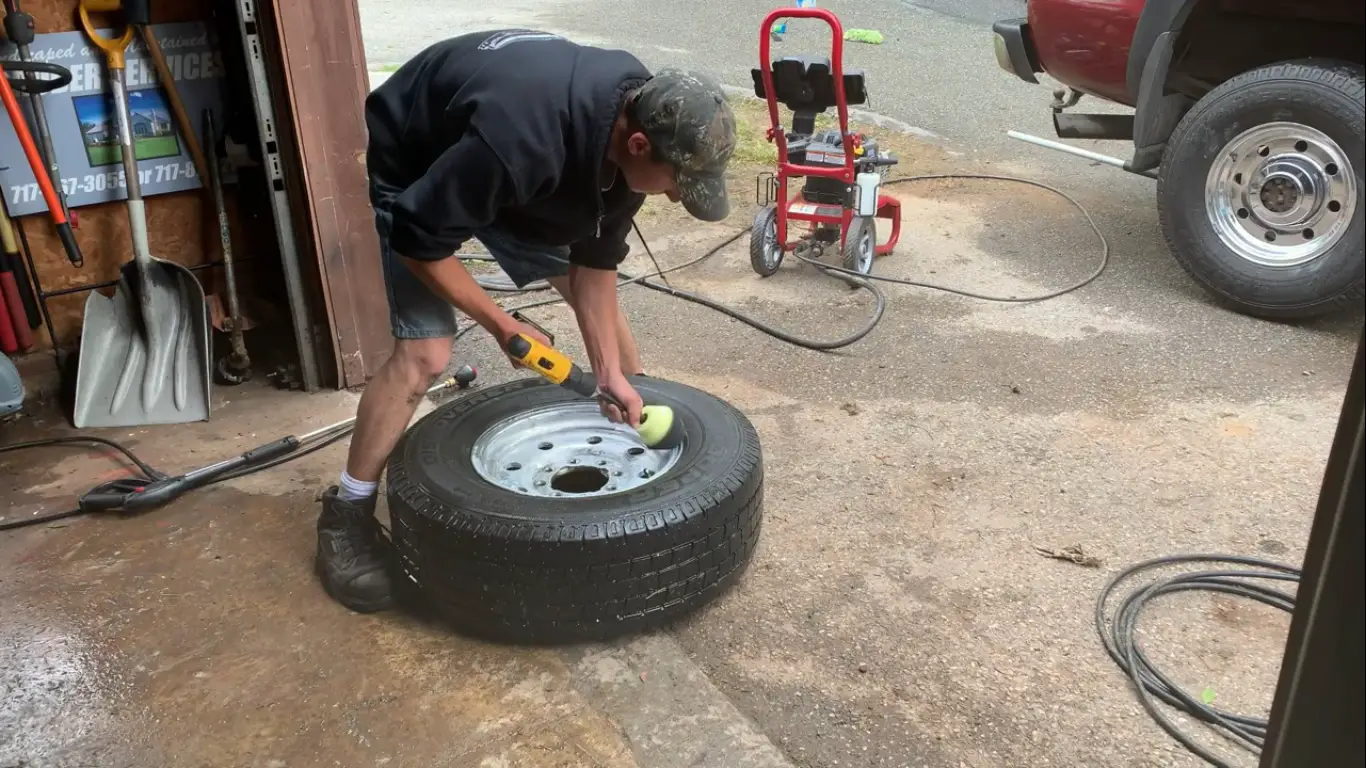
The first “Back” photo is a partial activity where I put sand feathers just across the bags’ holes. The picture below is my first Rim full of work.
I made dry sanding; a flexible pad with a hook & a loop of sandpaper that I would recommend has made it easier to fly in plac
Before and after the same wheel from my 2000 Honda (R) Odyssey, including the new Honda (R) cap. Background photo after removing the polyurethane coating.
Using a low-speed sander-polisher is essential. In my first attempt, I made a mistake by trying out the 11,000 rpm grinder I had. Hit the pad on the first wheel. So, I bought a cheap, flexible 1,000-3,000 rpm sander polisher. There is minor wear on the pad after making multi-alloy wheels, and sandpaper stays well again. Sure, a drill powered by a rope can be used, but I expect it to jump around the line too much and be too tired to control it.
Sander-polisher, you have stability and the right angle. You also want to set-and-forget at low speeds, which makes the sander-polisher do well.
How To Sand And Polish Aluminum Wheels
1.Adjust the work surface and wheels
Mark the position and subtract (weight) the scale
Before removing, mark the tire with a permanent marker and take a picture of its shape related to the tire design.
Preferably a jack car so that the wheel can rotate. I recommend using automatic stand jack (s) and wheel chucks in the park on the standard ground for obvious safety reasons.
If you are tied up around the issue of green nuts, remove everything except one lump or another nut in a size that does not exceed the wheel, for obvious reasons, and do not forget to put some nuts back when you have finished before lowering the jack.
The free investigation is best, but it is not necessary. I was able to accomplish this by riding in the back of my Honda® Odyssey in the park. In my default TJ, the front wheel turns in the park effortlessly (not with sand), which is good enough.
Alternatively, the corrugated iron is turned off, and the groundworks again. But bending over the wheel is a little ergonomic to me. I don’t want you can do it safely with a tire in a hand transmission car. So this can be your only option if your tires are too big to fit in another suitable car. However, it revolves around the apparent problem of the lug nut.
You can press it back carefully and insert the rod between it and the inside of the wheel to make it away. Otherwise, you may need to be careful to avoid it – however, make sure your tires have enough air to start with; -o). I sanded a few of them shortly before I got in. However, they continued with the air and the bike pu
Tires – unless you put some of your tires on, you may want to hide them or remove them from the rims.
I didn’t about that, and it only had minor effects on the surface of the tires. However, it is possible that the artist used below, which could drift and run, may leave marks or damage white writing when it enters (it was not mine), or that sanding could reprimand them if they are not careful.
2.Clean/finish. You don’t cover or harden your sandpaper.
Thoroughly clean and dry – blow-dry blower-blower-up drying process.
3.Remove the polyurethane-clear adhesive and any paint from all over the alloy wheel.
I don’t it would look good to strip only the polyurethane part, even if you only have to expand the inner part. I stripped it all off.
NOTE: I did not do it behind the wheel, but you can consider doing it at once and specify the back cover after the last step regardless of whether you attach it to the front. However, another clear coat will come out of the backline from excess spray when using a stripper spray.
Sprinkle with premium polyurethane “Strip” per.” Arrange for about one can for each of the two tires. I didn’t. You might as well want to spray the backside, too, because some rebel will step back and remove part of the polyurethane fabric anyway. You will want to use a glossy fabric on the backside, whether you are polishing or dressing the front, as it is complicated to polish and glue the back regularly.
Leave for a good 15 minutes. You can even see it reaching the sheets.
Apply rubber to the tire first and then use a hose or wash electric hose in the herd, including any residues in the driveway or other important area.
Clean, dry, and repeat, as it is necessary to remove all polyurethane fabric.
4.Sand, as needed, inside the nut holes
Make sure you have a good dust mask and safety glasses. Heavy gloves are recommended.
I found that the 100 grit sandpaper was attached to a cone-shaped attachment with a drill, giving it a nice mechanical look compared to the polished exterior areas that looked great after connecting to protect and insert new line nuts. See how the sandpaper explodes. Wrapping it in the right way (direction of the depth of the hole) will reduce this.
You install these holes first because it is easy to scratch the outer wheel in this process. If you do, that will be removed in the next step. I had to read this bitterly.
5.Soil between spokes
To machine-see between the spokes, sand the areas with sandpaper (80-120 grit) in one horizontal position.
Note: Initially, when I made my wheels, I put sand between the speakers AFTER the next step. But it is best to take this step first to avoid scratching those areas with smooth sand.
Folded sandpaper squares work well in large areas.
Spiral sanding rolls/cones work best in tightly closed areas.
6.Sand center, spokes, and line with low-speed sander-polisher and full grinding range
Also, make sure there are a good dust mask and mirrors. Heavy gloves are recommended.
I think it looks perfect for applying sand all over the wheel’s smooth surface, as I did in picture 2 AFTER and after the pictures above. I used a cheap, flexible 1,000-3,000 rpm sander-polisher at 1,000 rpm (sometimes 2,000) on one side of the focus and tongue.
In the first picture BACK, the tire was only complete in the middle, so I lowered my feathery soil just across the desert in the “Back” ima “e shown above and slowly came out each time with increasing thickness. I think it looks much better to make the whole area smooth for the wheel, though. However, that is more work.
Rims Restoration
When the Rim comes in for restoration, we begin by thoroughly examining the curves, cracks, and other aesthetic or structural intelligence. Once fully inspected, all the details are fed into the car or the motorcycle wheel. We will then verify the customer’s cost and comment on other items that may be involved, such as stem valve types, tire inserts, and other details.
If we replace the Rim on your car, the truck or motorcycle will need to be refined. To complete, the tire is first removed using an acrylic medium like sand. This method is superior to steel shot or metal oxide, which is widely used. Although they remove the finish very quickly and cheaply, they also build up and tear off another metal.
This is especially detrimental when you want to keep any manufacturer-generated tags displayed by the manufacturer.
The alloy wheel is then placed in an exploding cabinet with rotating plastic beads, removing the end without removing the metal. We do not do this in all cases because the old paint is always the best foundation. Sometimes we will fill in the existing finish, prepare the area and cover it with new paint.
The next step should be in the process is to restore the Rim to the curved wheel. This removes most of the damage as well as any side-by-side loosening.
Once the rim restoration is straight and accurate, it is time to refine, reassemble, or re-polish the tire. We use a computer-based color scheme to match the finish of the factory paint.
If the color is not in the file, our drawers can visually match or send a custom finish similar to the owner’s details. All tire replacement is guaranteed for one year. Also, we guarantee that tire repairs will be free.
While this warranty does not cover the replacement of the front repair wheel or the final damage due to improper use of chemical cleaning products or customer error, it includes color change, wilting, or peeling for no apparent reason.
If the tire has a mechanical edge, it is mounted on a lathe.
Once each vehicle is completed, the motorcycle tire or truck is tested for final quality. It is checked for expiration, and the finish is checked for dirt or dust in paint, unevenness, or orange peel. When all is tested, the used tires are ready for tire installation or delivery.
Pitted Rims
Frequently pitted rims mean Chrome wheels as well as finish resistant to acid rain, salt, etc.
How to Repair Salt-Spilled pitted rims
Clean the well-mixed tire using water, dishwashing, and cloth.
Wear safety goggles and gloves.
Wipe the affected area using fine-grit sandpaper.
Rub the freshly applied area with metal wool.
Wipe out the tire down with a damp cloth to remove any chrome or metal dust.
Apart from the above, how do you remove the bonded aluminum? Use sandpaper specifically for wet sanding (dry sandpaper will come down): dishwashing liquid, wet paper, and aluminum extraction sand. Finish using a fine grit of about 600-800 (as a dry sanding process). Way, take a straight razor blade and lightly scratch the damaged areas.
After that, can you adjust the installed pitted rims?
Paint the chrome wheels fitted with chrome polish and apply them to the molded area. An hour after polishing the surface, use a dry cloth to pierce the polish. This will help to fill in any marks and restore the natural brightness of the chrome face.
Refinishing Rims
Driehaus usually offers that Rim was refinishing and rim repair services are possible here. At his shop, we used to refinish wheels of foreign and domestic cars, trucks, etc. Automotive rims are having many types of finishes. And the most common ones are: painted, powder-coated, machined with clear-coat, and polished finishes. We can also remove rashes, scrapes, gouges, and paint discoloration caused by age or weather with our refinishing processes.
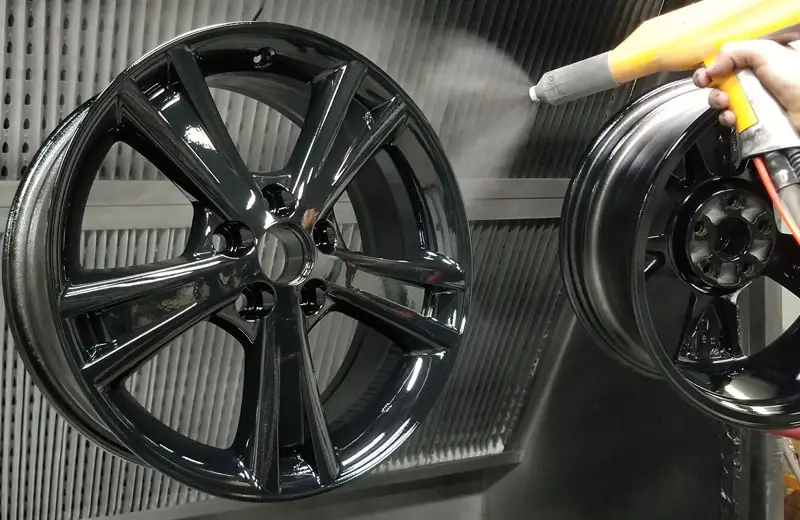
Paint or powder-coating is the most common finishing scrub used on cars nowadays. The painting process includes:
- Prepping the wheel.
- Adding primer.
- Applying the base coat.
When considering a full rim refinish, check out the rim powder coating option.
After that, the polishing process will give us the rims shine, as comparable to new chrome wheels. We can also restore your wheel’s original polish luster by using either hand polishing or machine polishing.
Alloy Wheel Restoration
If you have invested in a hybrid set of tires for your car, chances are you want to keep them in excellent condition. The combination of wheels is a fantastic feature of a car. Keeping them intact not only keeps your car in good condition but also helps the car maintain its residual value. Unfortunately, accidents do occur; broken alloys and curbed alloy wheels are the most common condition. In those cases, when your alloy wheels find themselves in a substandard state, you will want to replace them as soon as possible.
The good news is that here at ChipAway, we offer various services in addition to drawing and removing an oversized scarf. Among our wide range of auto body repair, we also provide tire repair service.
Our hybrid alloy service is designed to eliminate the need to purchase new alloys to renovate your car’s look entirely. Dedicated to helping your wheels get back to clean, our alloy repair techniques work on both alloys and alloy curbed alloy wheels or spokes. Our repairs are not as quick, but they are also expensive and economical. They are not expensive as a traditional body shop while also ensuring the highest quality results.
Our specialist repair engineers can also repair the most challenging tire repairs on your car. We do not have to compromise when it comes to an end, which means you can expect nothing more than professional, outstanding results.
Alloy wheels can give a relaxed breath to a car. Our hybrid repair service starts with cleaning up the damaged area, revealing the groove’s size, scrub or scarf. Once the alloy tire has been cleaned and the damage is complete, our technician will close the tire to protect it while the alloy is being repaired. During the repair of a mobile alloy wheel, the wheels will not be removed from the car. All repairs are possible with the wheels open. This means that there is no need to remove any impurities from the vehicle’s body to restore it.
The alloy wheels are restored by carefully sanding them to remove damage, such as a friction boat or chips in an alloy cylinder. Once the alloy is turned off, the filler can adjust the tire profile before sanding and adjust the alloy wheel alignment. This means that repairs can be made to a completely smooth surface of the car, allowing for a flawless finish.
Once the alloy wheel has been properly repaired, the repair technician will complete the alloy tire repair using the first colored paint to ensure that the wheels look ‘as good as new’. We have to use specialized equipment and technology to ensure that the final color blends well with the environment, so you will not even know where the repairs took place. This method of altering the alloy wheels allows for a light finish.
Here at ChipAway, we can adjust the alloy wheels to a very high standard, leaving a smooth and glossy finish. Our repairs will also prevent the risk of further damage caused by a scarf, scraper, or chip from exposure to weathering or harmful road salts. High curbs, low bollards, and deep holes are some of the most common causes of alloy tire damage that our automotive repair experts can correct.
At ChipAway, all our repairs are guaranteed. Repair of our alloy wheel is guaranteed six months after repair.