How do you skim coat a wall for beginners?
If you wonder how to skim coat a wall, then follow these bulleted lists,
- Eliminate the molting point first.
- Sand the surface of the wall lightly
- Clean the wall completely, without a dust
- Now, it’s time to apply the compound evenly.
- Dry the surface and sand again.
Is it hard to skim coat a wall?
It is not difficult as it sounds.
Can you skim coat over painted walls?
Once the skim coat is dried, you can paint it.
Can joint compound be used as a skim coat?
Yes, you can use the compound as an alternative to the skim coat.
How to skim coat a wall?
“How to skim coat a wall?” is a common question among homeowners. You may have come across the term, but you probably still do not know precisely what it refers to. Here are the definition of skimming and the different types of skimming mechanisms available on the market.
A skimmer (sometimes spelled as “sink skimmers”) is a type of water control device that removes water from a wall by using gravity. Skimmers can be attached to a floor pump or the pipe of a submersible sump pump. Water is pumped to the skimmer through a pipe. The skimmer then catches the water and re-circulates it back into the home or area where the water has been removed.
There are some different types of skimmers, depending upon their specific application. Most skimmers are used in residential areas, removing large volumes of water quickly and effectively. Examples of these devices include kitchen and bathtubs, basements, showers, lavatories, and toilets. Some skimmers can be placed on the exterior of a house. These skimmers can effectively remove water from rooftops and gutters and prevent rainwater from running into driveways and sidewalks.
Another type of skimmer, submersible water skimmers, is usually used in automobiles. These skimmers are placed under the hood or engine compartment and pump water through the pipes to the engine. The main advantage of these submersibles is that they are entirely hidden from view. They also offer the homeowner the benefit of eliminating the need for constant maintenance, saving money on routine tune-ups, and removing water damage to the car’s exterior.
Skimming coatings have also evolved over the years to protect structures against oil leaks, corrosion, and other hazardous conditions. A variety of layers can be applied, including epoxy, polyurethane, and more. Typical uses of this type of skimming include protecting structures from the harmful effects of corrosion, such as the buildup of rust, and protecting concrete walls from moisture damage. These coatings are made from materials such as aluminum, polyester, and steel. While these may sound like typical skimming material, many of these are highly resilient and can prevent leaks and cracks from occurring.
The material itself is highly flexible and can be cut to the size and shape needed for the job. It is advantageous because it allows for skimming on many different surfaces. The coatings are often resistant to corrosion and can provide the homeowner with a long-lasting solution. How to skim coat a wall? With a quality skimmer, the answer should be obvious.
Tool Requirements
- Paintbrush
- Roller sleeve
- Mud pan
- Taping knife
- 4-in-1 screwdriver
- Squeegee knife
- Paint roller
- Sanding pole
- Safety glasses
Material Requirements
- Masking tape
- Primer
- 120-grit sandpaper
- Drywall compound
Step#1 Prepare your wall
Many people don’t know how to paint a wall. If you’ve ever tried texturing drywall, you know that it can be messy, and you also know that you need to prepare the surface properly for your paints to stick and do their job correctly. The trick is preparation, not paint. To paint a wall, you need to follow two basic steps: remove the existing paint and prep the surface properly for the new color.
When you remove the old painting, you need to make sure that you strip off all old adhesives. It will help prevent future problems, such as peeling and bubbling. Next, clean the area with a degreaser or something similar. It’s best to get all of the dirt and dust off of the walls so that the painting doesn’t pick up anything.
It means prepping the walls with primer. For most types of painting, you should prime the outside before you begin to paint anything else. For example, if you are painting the inside of a door, you should first apply some primer to the outside door before painting. It will help keep the primer from just washing off and give your walls a better overall appearance.
Painting the walls with any paint or varnish shouldn’t be necessary unless you have ancient wallpaper or other flaws in the paint. As mentioned above, if you are prepping the walls for painting, you should already have primer on the outside. For fresh paint, apply the primer with a brush or roller. Make sure to allow the primer to dry completely before applying the paint. Do this twice: once you paint the entire room, and then once before you put up the blinds or other finishing.
If you are doing a small room, you can skip the primer and go straight to the topcoat. However, if you are doing ample space or using many different colors and shades, you recommend that you apply at least a drywall skim coat plaster and topcoat. Skimming is an excellent way to make sure that the wall has a smooth wall. It will allow you to paint more times than you would have otherwise since you will get a smoother result as you go over the wall’s surface.
One great thing about applying skim coat drywall is giving your paint a matte finish. If you don’t like Matt’s finish, don’t apply a full skim on the wall, but rather a quarter skim. It will give a slightly rougher, non-matte look to the plaster and give you the ability to paint more often.
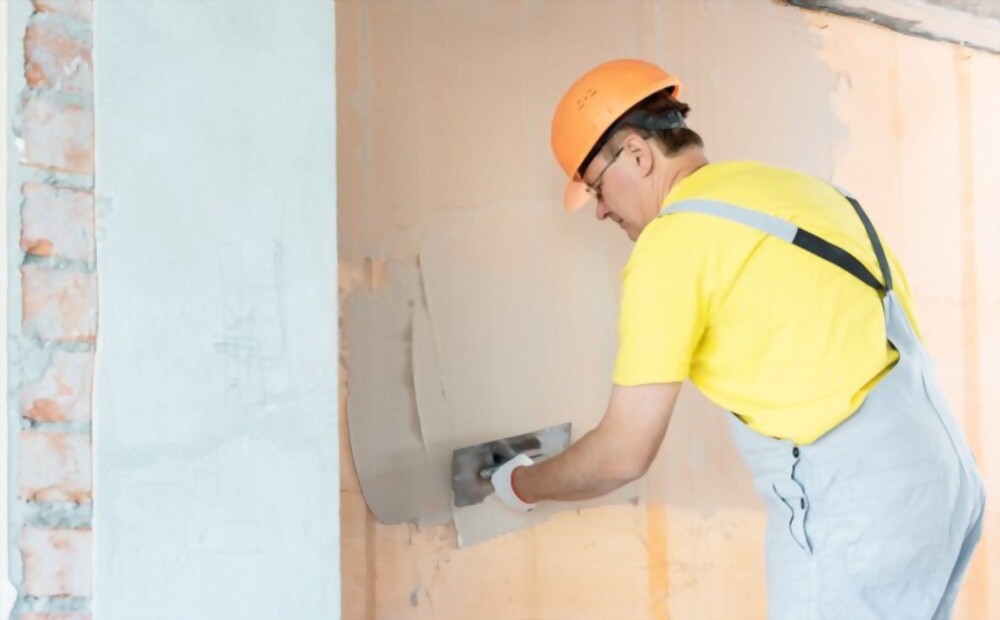
Step#2 Roll-On the Mud
- Now, blend the all-purpose compound in a mud consistency for bedding tape; remember to do it as thin as possible to roll on the wall.
- Next, roll the all-purpose compound on the wall and make it a thin layer. If the wall is heavy, move it faster.
- Remember to do it in small areas before it dries to give a smooth surface finish (Skim tips).
- Utilize half-inch nap roller to roll mud on the surface, which is 4-ft square.
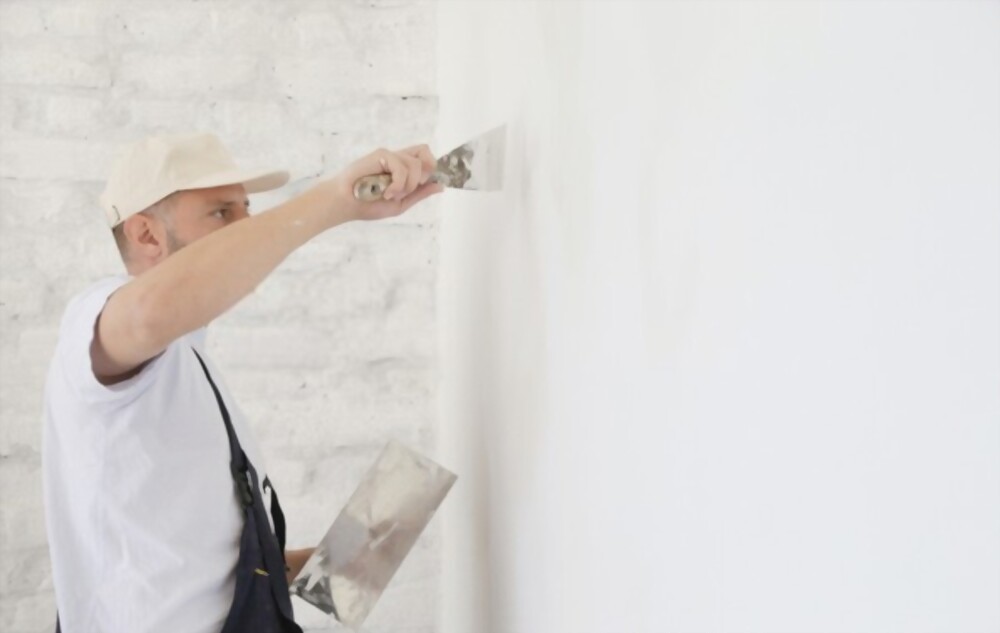
Step#3 Trowel the First coat
If you are doing any painting or repair on a wall, such as repainting a kitchen, you must use trowel marks to identify and highlight the areas that need to be repaired or painted. Using a wet/dry trowel allows you to sweep at a wide angle for the paint to adhere better and, in turn, gives you a much cleaner result than using a roller. It can also prevent you from damaging your wall when you are doing the actual work. When you are learning how to do trowels the correct way, it may take some time, but you will find it easy and enjoyable to complete work on the wall and enjoy the results when you are a professional in art.
If you have ever tried to do this task with a roller, you know what can happen. You get your trowel wet and try to spread the paint all over the room. Then you notice something come up right where you wanted to do a straight line, and you stop halfway; you realize that you missed a perfect spot, so now you have to go back and start again. It is frustrating if you are trying to make minor repairs on small walls.
Trowel marks make the job so much easier and faster. It allows you to identify tight areas that might not otherwise be visible until the second coat. The first coat dries; this will enable you to do a more even and smooth job on the wall. The trowel acts like sandpaper on the wall and takes out imperfections, even those you would not usually see. You can also use your scoop on unfinished walls, such as those that have wallpaper.
The key to a good and even trowel coverage is the first coat; it must dry without a wet spot. It will consume an hour on each coat, depending on how large the area is and how much paint you are dealing with. Using a wet/dry sponge dipped in water, the first coat dries fast and quickly. If the first coat is dry, you can work in two directions at once, either across the wall or along a slight edge. Either way, the trowel must be done over the area, and then a wet/dry sponge dipped in water is used to finish the repair.
Some contractors prefer to use an old wooden slat of wood to score the wood before applying the mud. Score marks are not nearly as easily seen as mud marks, but you will probably still be able to make out some imperfections. Once the first coat of mud is applied to the contractor, it may want to use a second coat of earth to give it a smooth finish and make the repaired area appear.
Once troweling is complete, it is time to sand the repaired area. Most contractors prefer to have their clients’ skimming the area, but many homeowners like to take a scrap of plywood and use that as a sander. Whatever method you choose to sand the area first coat of mud should be applied to seal the trowel in place. Skim coating walls allow you to skim the repair without actually finishing the entire project.
Step#4 Pull up from the below
- After it is half-done, take a knife and swipe it from the bottom to obtain a smooth finish. It will remove the excess and make it clean.
- If you complete the process, roll the all-purpose compound on the lower part and pull the trowel upward.
- Now, again use the squeegee knife from the low part of the wall.
- Remember to concentrate on edges too.
Step#5 Scrap the lumps
- Wait till your first coat of compound is dry.
- Now, you don’t need to sand the surface; take your putty knife and knock off the lumps to avoid streaks.
- Brush the wall and make your wall ready for the next coat.
Step#6 Change the direction for your second coat
- You need to apply two to three coating of an all-purpose compound, it is a tedious process, but trust me, it will dry up soon. Because thin layers will dry faster than dense ones, remember that there is no need for sanding if your wall is smooth.
- Trowell each layer at a perfect angle to the before one
- If you encounter there is an imperfection, then trowel for the third coat.
- After the last coat, sand the surface with 120-grid sandpaper.
- Still encounters the hits and strokes, use 100-grid sandpaper to make your wall smooth.
Type of drywall texture: There are many types of drywall texture, namely Comb type, Orange peel type, Popcorn type, Knockdown type, Slap Brush type, Sand Swirltype, and Slap Brush Knockdown type.
What is skim coating?
Making an ugly wall into a pretty one with a compound layer is know as Skim Coating.