If you like decorating interior items in the style of shabby chic, chalk paint is a key element for actualizing your dream. So, how to make chalk paint at home?
It’s a snap to have homemade chalk paint with soda, Plaster of Paris, cornstarch, calcium carbonate, and tile grout. With the help of these materials, you can update any piece of decor or furniture.
Let’s keep track of our post to get the best DIY chalk paint recipe. Finally, you will find applicable instructions to emphasize texture and achieve a beautiful, natural shade.
Check it out now!

How To Make Chalk Paint At Home? 5 DIY Recipes For All
Some people prefer to buy Chalk Paint® of Annie Sloan, but every designer should still prepare chalk paint at home. We found several recipes with different ingredients and available tools to start your projects.
Now, pull up your sleeves and have fun!
With Baking Soda
This method is one of the budget options, since you can purchase all the components at any store. A feature of this recipe is the resulting rough finish since the baking soda does not dissolve and acts as an abrasive. Depending on the desired result, the surface can be left grainy or sanded.
It is better to use a blender to mix the soda evenly with the base. For full coverage, you can cover the surface with three coats of baking soda chalk paint. This DIY chalk paint is very fond of using needlewomen for decoupage works.
Preparation
- 1 cup of baking soda;
- 2 cups of latex paint;
- Water if necessary.
Processing
- Take two parts of latex paint. When choosing a latex product, you should immediately consider the type of shade, as the final color of the product or coating depends on it.
- Gradually pour 1 part of soda into it and mix it thoroughly.
- If the composition is too thick, add a small amount of water, literally in a spoon.
Result
Baking soda chalk paint allows you to get a distressed look. It can be sanded if necessary. You can simplify the mixing process using a construction mixer.
Apply a soda composition in 3 layers. The recipe is perfect for souvenirs and decoupage works.

With Plaster Of Paris
Using Plaster of Paris, the finished paint will dry either faster or slower depending on the manufacturer. So, the use of water is mandatory.
The texture of the painted surface promises to turn out to be matte and velvety finish. But if you do not mix the paint well, a rough finish may form on the surface that will require you to sand it later.
Preparation
- 1 cup of gypsum;
- 3 cups of latex paint;
- 1 cup of water is required.
Processing
- Stir the gypsum with water.
- Inject three parts of latex wall paint. It is also better to stir with a blender.
- The consistency of the finished paint should be similar to thick sour cream. Otherwise, add more water.
Result
The finished product may be a matte velvety texture. To achieve the desired quality, you need to mix the composition thoroughly for a very long time.
For full coverage, it is necessary to apply a minimum of two coats.
Note
The gypsum-based material hardens quickly, but the mixture can be diluted with water during the painting process.

With Cornstarch
Another inexpensive ingredient that you can use in your project is cornstarch. The only question that may arise is: how much water to add?
Water added to the mixture of starch and paint only dilutes the resulting mixture. Therefore, you need to pour in as much as the desired consistency requires.
Preparation
- 1 cup of corn starch;
- 2 cups of latex paint;
- Water if necessary.
Processing
- You mix all ingredients and dilute the mixture with water until it obtains a thick sour cream consistency.
Result
The texture turns out to be a slightly rough finish that will require sanding for a flat surface. But the quality of the paint is in no way inferior to the industrial one.
It’s necessary to apply the paint in at least two layers to avoid bald spots on the surface. You can apply the composition in 2-3 thin layers for a more saturated color.

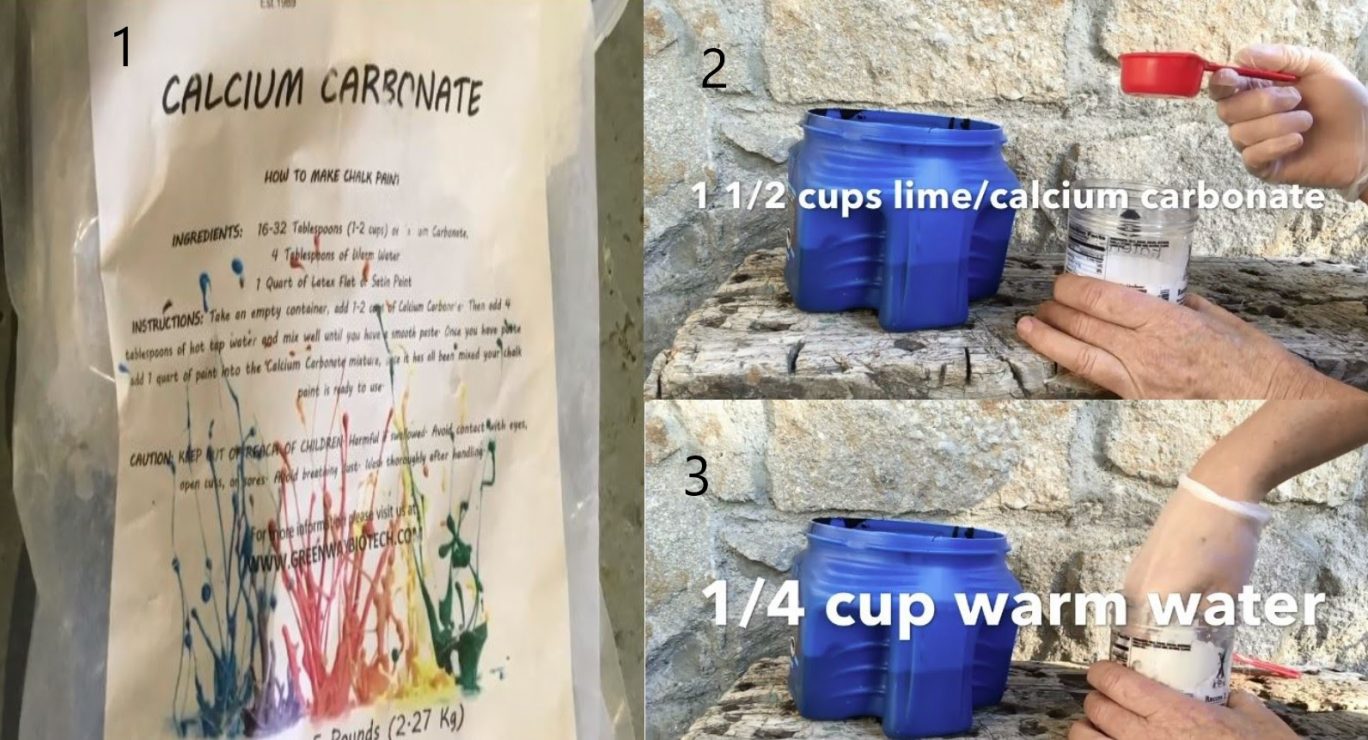
With Calcium Carbonate
Calcium carbonate is more difficult to find than other ingredients. You can use acrylic or latex paint with it. It’s possible to mix pure calcium carbonate with color.
It’s one of the most expensive chalk paint recipes listed. But the quality of the finished paint is an order of magnitude higher than the others.
The finish of painted furniture will be matte and smooth, requiring no sanding. It is this recipe that is popular for reworking furniture and decor items.
Preparation
- 2 cups of latex paint as a base;
- 1 cup of calcium carbonate;
- Water if necessary.
Processing
- Knead the carbonate with a little hot water until a pasty mass without lumps is obtained. Cool it completely.
- Add that powder to the latex.
- Mix the blend with a mixer.
Result
The coating with this DIY chalk paint recipe will turn out to be relatively smooth with a little rough finish. For a high-quality finish, two layers are enough.
With Tile Grout
A more budget-friendly option will come by using tile grout. But again, the results all depend on the properties of a particular grout mixture.
Tile grout affects the final quality of the mix. It is better to use proven brands, for example, Ceresit or Home Depot. Before choosing anything, carefully study the features of the composition and use.
Preparation
- 1 cup of the trowel mixture;
- 2 cups of latex paint;
- Water if necessary.
Processing
- Add two parts of latex pigment to a part of the grout mixture.
- Dilute with water to a working consistency.
Result
The resulting coating is uniform, smooth and does not require sanding due to the absence of difficult-to-dissolve substances.
For a dense coating, two coats of the application are sufficient to sheen your furniture.

Tips On Making Chalk Paint For Sprayers
More interestingly, homemade chalk paint works with the sprayer! But, how will you make chalk paint for sprayer use?
It’s necessary to modify your recipe a little bit by adjusting the amount of water added to the mixture. You will want a result that closely resembles the consistency of regular latex paint. When your chalk paint is ready to spray, Annie Sloan will teach you on how to apply it by using a spray gun with this video.
However, be careful when using the sprayer with the plaster-based chalk paint due to that blend faster dry than other materials. You can run into trouble when concentrated ingredients get stuck inside the sprayer.
Remember to clean the sprayer after each use. This note works for every project, not just for using chalk paint.

Description And Properties Of Homemade Chalk Paint
The homemade chalk paint is practically not inferior in quality to industrial products. It’s more difficult to obtain the desired sheen, but the surfaces are stable and durable.
Characteristics Of DIY Chalk Paint
It’s possible to get store-bought chalk paint. But it is much more convenient and profitable to prepare such a composition yourself.
Before deciding to rework furniture using chalk paint, it is worth studying some of the features of its use:
- The mixed paint itself dries very quickly, so you have to work at an accelerated pace;
- You can paint any surface (wood, metal, and chipboard);
- After drying, you can not only wipe the surface with a damp cloth but also wash it;
- The material is considered fireproof and you can use it to sheen walls or furniture in any room;
- Despite the resistance of the paint to abrasion, it is still afraid of strong mechanical stress. Just like any other, you can scratch the surface with sharp and hard objects;
- After painting, it is better to protect the top coat with wax.
The most popular use of chalk paint among designers gives antique effects to furniture, doors, and other interior elements. For full coverage, the paint is applied in at least two or even three coats.
Depending on the added components, the surface can turn out either smooth or textured finish. And you can vary this quality by decorating various projects.
Note
When making DIY chalk paint, it’s necessary to monitor the finished consistency. The base (paint) and the additional components themselves are different for everyone, from different manufacturers, and have different properties (density, whiteness, drying time).
Pros And Cons Of Chalk Paint
Pros
Cons
- Beautiful natural shade
- Matte texture
- Environmentally friendly and hypoallergenic
- Good adhesion
- Versatility
- Large selection of shades
- Ease of application
- Possibility of self-production
- Aligning small defects
- Risk of a mess
- Reduction of color intensity after drying by 30%
- Low mechanical strength
Scope Of Application Of Chalk Paint Recipes
You can use chalk paint in different areas. Let’s find inspiration for your projects.
Home Furnishing
We are used to painting furniture and parts of walls, making drawings on wood, and decorating kitchens or corridors. It’s possible to use it for painting frames, openings, and other details.
Teaching Children
It’s exciting to have chalkboard paint to transform any surface into the place that is ready for you to write on it.
Kids also can have their painting projects by using chalk paint. It’s supposed to be less harmful than the majority of industrial products. Make sure to follow the Arts and Crafts Safety Guide for Children before allowing your kids to play with chalk paint.
Decoration Of Offices, Stores And Cafes
It’s a great idea to use DIY chalk paint for interior decoration of offices and cafes, or writing menus. You can also create some slate boards and souvenirs. They will be perfect personalized gifts for friends and family.
Application Recommendations
Most often, manufacturers indicate on the cans that the surface does not need preparation. That is, it is not necessary to remove the old coating, putty, or primer.
But, as practice shows, the paint will not always adhere and lay down well. Therefore, at least minimal preparation will have to be done.
The most important requirement to start any project is a clean surface that is free of dirt and dust and degreased. If we are talking about the same laminated furniture, you will have to wipe it with gasoline or soapy water and dishwashing detergent. If a wooden base is to be stained, you will also have to put away all existing depressions and flaws.
You need to dilute and tint the paint before use, if necessary. For dilution, use water not more than 15% of the total volume.
Proceed To Surface Preparation
- Clean it from dirt, grease, and dust with soapy water and rinsed thoroughly with water;
- Protect the floor from paint, glue slopes on windows and doors with masking tape;
- Cover irregularities and chips with plaster, grind the protrusions;
- Prime the surfaces to improve adhesion;
- If you are processing an area with wallpaper, you must wash it and cover it with an acrylic primer. It is better to work at temperatures up to 25 degrees.
Start Applying Paint
- Stir the paint thoroughly and pour it into a small tray as the composition dries quickly. So, close the jar immediately;
- Dip a brush or roller into a tray, paint over the working areas;
- Use a small brush to paint the joints and corners to avoid unevenness;
- Wait 2-3 hours and apply a new layer;
- You should follow the manufacturer’s instructions for the number of coatings.
Attention For The Perfect Finish
Artificially accelerating the drying time, for example, using a hairdryer, is not worth it. The quality may suffer from this, and the paint will begin to peel off.
When all the parts have dried, you can start applying the wax to sheen the surface. To do this, you need a sponge or a brush with very soft bristles. The choice of tool depends specifically on the type of wax you choose.
After 15-20 minutes, rub the applied wax with clean cotton cloth with light circular movements.
If you did everything correctly, the painted and waxed surface would become completely dry, having a velvety shine. By this way, it’s easy to update old furniture, doors, or other interior decor items with homemade chalk paint.
Frequently Asked Questions
If you’re unwilling to keep track of the lengthy instructions above, you might want to get a quick glance with the FAQs as below.
What Are The Ingredients Of Chalk Paint?
There is a difference in composition between industrial products and DIY recipes. We will talk about a few small aspects of the whole process.
The base of the store-bought chalk paint is natural chalk, diluted in water. To obtain the pigment, synthetic and natural dyes are used, including resins, casein, linseed oil, silicates, metal, and clay.
If you want to make your own chalk paint at home, it’s a snap to utilize kitchen ingredients, such as baking soda and cornstarch. Mixing them with a little high-end latex paint, you will get a stunning recipe for your craft.
Can You Make Chalk Paint With Baking Soda?
Baking soda based chalk paint is something that You can absolutely pull off. This material is usually more readily available than calcium carbonate or alabaster.
However, the paint obtained from it gives a very grainy surface. If you are not worried about the texture of the paint, a semblance of chalk paint can be made using baking soda by following our recipes above.
Is Homemade Chalk Paint As Good As Store-Bought Products?
Of course, DIY chalk paint cannot deliver a perfect sheen like the industrial products do. But it is effective in saving costs for small projects.
Follow the comparison table below to get an overview of these two options.
Homemade Vs. Store-Bought Chalk Paint
DIY recipes
Industrial formulas
Industrial paints dry within 2-6 hours but cure completely within a week. Homemade mixes can take much longer to dry.
Can You Make Chalk Paint With Acrylic Paint?
You can use any acrylic paint for construction. We will just tell you how to make this magical paint of excellent quality and with minimal costs.
Preparation
- 3 cups of acrylic paint;
- 1 cup of building chalk;
- 1 cup of water;
- A glass jar with a lid.
Processing
- Pour acrylic paint into a glass jar;
- Add white building enamel to artistic acrylic paint;
- Add as much color to get the desired shade;
- Mix everything thoroughly until smooth. Artistic acrylic blends perfectly with building paint.
Note
It’s imperative to add sifted chalk to the mixed paint and stir well until there are no lumps left. Otherwise, grains will remain on the painted surface after drying.
The mixture should resemble liquid sour cream.
- If the initial acrylic paint is initially liquid water, you add less.
- If it is thick, it requires more water.
- If the paint is very liquid, it’s necessary to add a little chalk.
The paint is ready, you can paint it right away if you really can’t wait at all. It is better to close the jar with a lid and let it stand for about 6-8 hours for the components to marry.
Final Thoughts
It’s a snap to know how to make chalk paint, isn’t it. Nothing is impossible if you want to do it.
By combining our recipes with a little skill and your creativity, it’s absolutely possible to make the reality of a stunning project.
We hope to get your sharings about astonishing ideas on making chalk paint. Keep track of our site to update the latest post as soon as possible.
We wish you creative success. And have fun!