In this following article, we will discuss “How To Make A Concrete Step”. If you don’t want to start working up by using the old steps and then suddenly you will find yourself in the basement which is all covered in rubble.
You can be easily able to identify steps which are built over wells by using a glass access panel built in. Most of the time the panel has been broken or removed, but the patch should still be visible. So, don’t even think about starting the demo process without even asking the homeowner or basically paying a visit into the basement and also investigating with your own eyes.
What kind of concrete do you use for steps?
Usually poured concrete steps will also provide a sturdy, long-lasting transition between an outdoor surface, like a ratio, and then direct entry to your house. Also, deciding how high and how deep (front to back) each step should be more confusing. And the right answer to this question is found in some simple math which you can easily use to compute the unit rise (vertical height) and run (horizontal length).
When you are going to consider the total sum of the unit, local codes will also require the top landing to be at least 12 inches behind the door swing. Subtract the width of an out-swinging door (usually 32 or 36 inches) from the length you have already measured between the foundation to the outside edge of the steps. If the remainder is now less than 12 inches, then you may need to change your plan.
But make sure you know and understand the coding before you start planning concrete steps. If you don’t create them according to a specific code, a building inspector can also make you tear them out. Codes can also contain requirements about the placement of rebar or other reinforcements, same as the concrete mix which you use.
If you expect to spend two to three days to plan more, lay out, and also pour three concrete stairs (but not counting curing time). Then you should follow all these step-by-step instructions to improve your exterior with concrete steps.
Measure Rise And Run
You will have to measure the rise and run of the area where you are planning to place all the steps. Drive basically stakes to indicate where the base of the bottom step will be when poured. Computing the unit rise and run of the steps, and drawing a dimensioned sketch.
How to Compute Rise and Run
The unit rise and unit run of steps are the specific dimensions of each riser and each tread.
To compute the unit rise and run, first of all you will have to divide the total rise by a minimum of 7 inches, which is a standard step height. And then rounding up fractional results to the nearest whole number. Then simply divide the total rise again by this number to get the exact unit rise.
For example, here is the math for a total rise of 20 inches: 20 inches/7 inches = 2.8 (which is rounding up equals three steps). 20 inches/3 steps = 6.6 inches. In this example, you will always need three steps 6-5/8 inches high to climb 20 inches.
Next, you will need to divide the total run (to the outside edge of the door sweep) by the number of steps to get the exact unit run. For example, if your total run was 48 inches, here is the math: 48 inches/3 steps = 16 inches per tread. Also, a tread depth of 16 inches would probably feel too long. So, you will have to adjust the tread depth to 13 inches, which is known as a more comfortable measure, and then make the total run 39 inches.
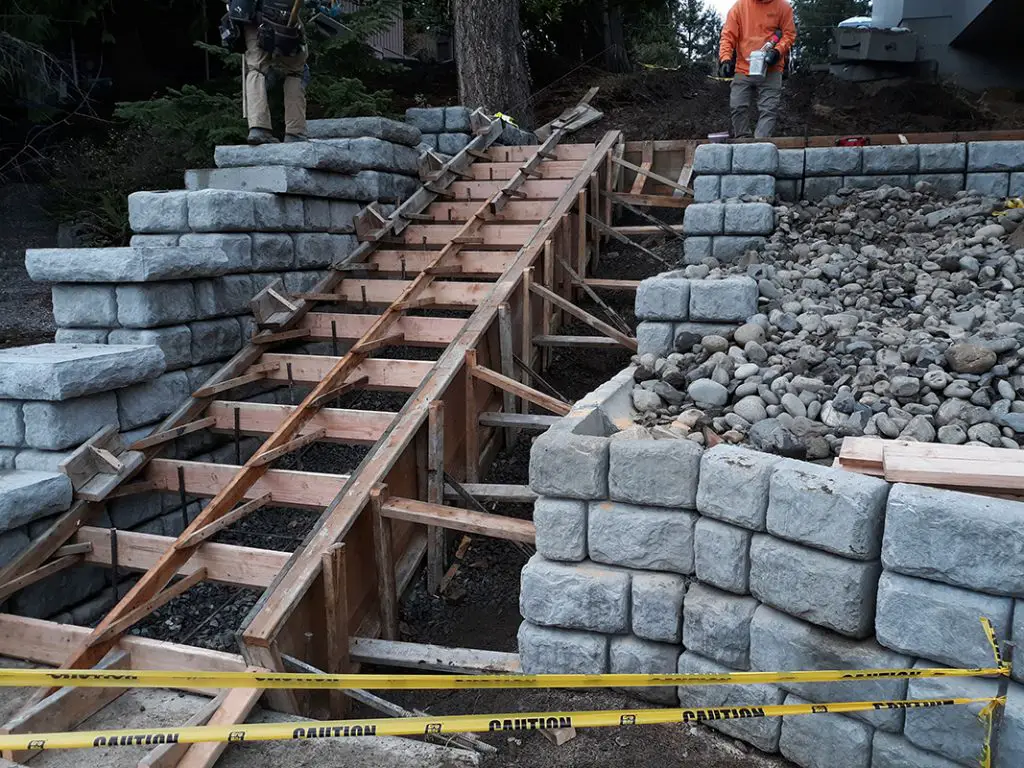
Lay Out Footings
First of all you will need to lay out footings 3 inches wider than the given steps. Excavate the footings to the depth codes required, then pour the concrete, and then insert 12-inch lengths of rebar 7 to 8 inches in the footings. The top of the rebar should be about 2 inches less than the finished height of the steps. So, let the footings cure, and then simply dig a 4-inch trench between them and try to fill it with tamped gravel.
Outline Steps
By using your plan and the actual dimensions which you have computed and sketched, you will need to draw the outline of all your steps on a specific sheet of 3/4-inch plywood. Then you will just need to draw the line for the landing so it slopes 1/4 inch per foot. Clamping a second plywood sheet to the first, edges flush, and then cut the outline of the step with a jigsaw.
Check Square, Level, And Plumb
By simply using a framing square to make sure the forms are properly perpendicular to the foundation of the house, then set the forms in place, and also drive supporting stakes along with them. You will have to install Riser Forms
For each concrete step, you will have to cut a piece of 2x lumber to the width of the stairs and cut it to the height of the unit rise if important. Bevel the lower edge of each riser (excepting the bottom one) to make it easier to float the tread when you are going to pour the steps. Fasten the top riser form to the outside of the side forms with basically three 2-inch screws. Then you will need to install the remaining riser forms.
Attach Braces
You will just have to cut angled braces and then try to fasten them to the side forms which are at the front edge of each step. Then drive 2×4 stakes at the bottom of the braces. After that plumb the side forms and which fasten the braces to the stakes. To keep the riser forms from bowing, you will have to drive a 2×4 stake 18 inches or deeper into the ground in front of the steps. After that you will need to attach an expansion strip to the foundation basically with construction adhesive.
Fill With Rubble
For saving concrete, time, and money, shovel rubble (you will have to clean chunks of broken concrete, river rock, or any clean masonry) into the space inside the forms. Then you will need to pile the rubble higher which is basically under the landing than the first step, but don’t need to put in so much rubble that it will help you in making the concrete in the steps too thin.
Add Rebar
To strengthen the concrete, and also bend lengths of 1/2-inch rebar so it may roughly correspond to the shape of the rubble mound and lay it on the rubble at 12-inch intervals. You will need to wire perpendicular lengths of rebar across the first pieces. Then you will just have to raise the rebar up and basically support it on dobies or balusters which you wire to the rebar.
Mix And Fill With Concrete
Usually before pouring concrete steps, you will need to coat the forms by using a release agent. You will have to mix the concrete and then simply bring it to the site in wheelbarrow loads. You will just have to shovel the concrete inside the forms, and start with the bottom step and work up. Click the sides of the forms and risers by using a hammer and jab a 2×4 up and down in the mix to drive air bubbles out. Then you should give the concrete enough time to set between the rubble pieces, and also add more concrete if needed.
Edge Risers
You will have to run an edger with the inside edge of each riser form to round the front edge of each step. This will help you in minimizing chipping. If you’re now going to cover the steps with brick, tile, or stone, you will have to leave the edges square.
Remove Forms
So, let the concrete set up long enough to support its own weight, then you will have to remove the riser forms and then finish the concrete by using a trowel. You will need to use a step trowel (a drywall corner knife works as well) to make the corners smooth. And then simply broom the treads to roughen the surface, so let the concrete cure, and then install the railing. After 12 to 24 hours, you will need to remove the side forms and also fill in any voids in the concrete.
Do concrete steps need rebar?
The concrete steps are to be informed with steel bars basically to carry the loads which are coming upon the stairs and then transfer them to the ground.
The term “rebar” basically refers to a reinforcing bar which is used in concrete construction to strengthen structures. These bars can also be made by using different types of alloys and some varying grades of steel. And usually determining the right kind of bar to use for some concrete stairs which usually depends on many factors, such as how tall the staircase is overall.
Benefits of Using Rebar in Concrete Steps
There are lots of benefits to using rebar in your concrete steps. The most important advantages are discussed in more detail below.
Reduce Tension Stress
The end of any concrete structure is the strongest one. And tension stress basically occurs in the middle of any structure. In these types of cases, it usually occurs most in the center of each step.
Tension stress can also cause damage and breakage to occur when too much weight is placed on it. Tension stress can also be accumulative and arise from consistent usage over time.
Also rebar strengthens concrete, but it reduces this stress. And when the weakest part of your structure is more sound, damage is significantly less likely to occur.
Reduce Necessary Thickness of Concrete Stairs
If you were about to create your own concrete stairs without using rebar, you would need much more thickness to make sure stability. So, basically the use of rebar will allow for the steps to be thinner while still maintaining maximum strength.
Local Building Codes Often Require Rebar
So, if you are using rebar you’ll be following some local building codes. Most of the local building codes also have minimum requirements when it comes to the usage and placement of rebar and also other supporting structures.
How do you pour concrete steps?
1. Curb appeal
A stoop can also be able to crush a home’s overall curb appeal. And when you are going to build concrete steps is more complicated than simply pouring a simple sidewalk, it is probably not as tough as you think. We all spent the day with the masons at Above Quality Inc., and they literally showed us how they used to pour concrete steps which really look great and will last for decades also. They also gave us some simple step-by-step instructions which even a beginner could also follow and some more great tips that long-time pros will appreciate.
2. Demolition Hammer
If you are not owning a breaker hammer, you should prefer renting one. Most of the old stoops were already poured properly thick and some are also incredibly hard to boost up. Don’t try to order the concrete truck when you already know what you are actually dealing with. Even the positives we shadowed have spent the better part of a day on the demolition of one stoop. Some stoops also had to be tackled by using a skid steer which is basically fitted with a breaker hammer.
Whether you are using a breaker hammer or a sledge hammer, it will help you locate the rebar (if there is any) and strike basically with its length. Sometimes, the concrete can also be more easily broken apart if you are following the rebar.
3. Clean top edge
It is completely fine if some of the old concrete sticks to the house. But it is more important to clean off the top area or it will show, especially when the new stoop is going to be poured at the same level or less than the old one. Knocking off the remnants by using a hammer and cold chisel.
4. Step risers
If you are also going to replace an existing stoop then it is basically that part of the sidewalk which will need to be replaced along with the stoop, even if the sidewalk is in good shape. The main reason for this is that the distance from the top of the new stoop down to the top of the sidewalk may not convince the allowed height and width of each stair riser and also tread as spelled out in current building codes.
5. Footing construction
A stoop always needs to sit on footings. If there are no footings in place, then some new footings need to be added. This crew usually launches pier footings, like the ones that some decks and porches are usually supported by. The depth of these footings varies depending on the climate in that particular area. Footings in this part of Minnesota always need to be 4-ft. Which is deep to prevent the frost from heaving the stoop. The new footings and the stoop can be poured at the same time. This stoop will also be built on the existing footings that are a main part of the house foundation.
6. Concrete form
Use 3/4-inch plywood for the side form boards. Then you will have to dig a trench to secure the bottom of the plywood. Then you will need to secure the sides with 2×4 stakes. Don’t need to be worried if the stakes are a little sloppy at first. This looseness is actually a good thing because it will provide you a little wiggle room to make some small adjustments as you are going. The stakes will also be reinforced when everything is in place. So, it’s okay if the screws are securing the stakes to the form run past the plywood into the steps. Those little holes will be easily filled when all the forms are pulled and the sides are completely finished. So, you will need to leave the stakes which are basically closest to the house several inches away from the wall, so you can easily knock them back and forth when it’s time to remove them completely.
7. Check for square
This crew will help you in checking that the form is square with a large speed square. A framing square would also work good, or you could also measure diagonally from one corner to another and then easily compare that specific measurement with the distance from the opposite two corners.
8. Reinforce the step form board
You will have to add a 2×4 (which is called a strongback) to the front of each step’s form boards. This will help you in keeping the pressure of the concrete from bowing out the boards.
How thick should a concrete step be?
11 inches
The 7-11 rule is one that’s basically used (maximum riser height of 7 inches and minimum tread depth of 11 inches). Risers should also be at a minimum height of 4 inches.
Concrete steps or terraced staircases are the most important feature at the entryway of most of the homes and public buildings. And also elevating concrete stairs from bland to grand makes them the dramatic focal point of any front entrance. Even great visual impact is usually possible by combining some of the decorative ways along with stamped or stained concrete walkways.
Concrete steps can be also poured correctly with your walkways or entryway, so they can also be colored and textured to match with them. Precast concrete steps and precast concrete stairs may be an option. If you know just where they are required, you can also have the steps built off-site and installed later on your project.
Concrete Stair Design
When you work with a contractor to come up with an attractive design for your front steps, you can also begin with narrowing down your decorative options. Here are some more ideas for creating concrete stairways that are a great step above the ordinary. For more inspiration, You will browse through our photo gallery or can also ask contractors to show you portfolios of all their past projects.
Choose a color scheme
Here are some methods which are basically used for coloring exterior concrete flatwork that are equally suitable for staircases. The most popular ways usually include adding integral color, staining, and applying dry-shake color hardener. Some of the contractors combine all these techniques to produce some unique color variations and marbling effects. Color hardener and integral color are the basic methods which are most commonly used with stamped concrete, with each offering advantages and disadvantages.
Concrete porch steps are also very easy to color integrally because of their vertical step faces. But if you really want the rich color and also add some durability which is basically provided by a dry shake, then it is really possible to apply the hardener to staircases. He already advised contractors to mix the color hardener with some quantity of water and a concrete bonding agent basically to achieve a consistency similar to cake icing and then directly apply the paste by using a small trowel or float before stamping.
Choose a stamped concrete pattern
There are basically more than hundred stamp patterns to choose from, which ranges from slate, to brick, to cobblestone, to botanical and to wildlife themes also. Because today’s stamping mats are also molded from the actual materials which they usually mimic, they also produce some amazingly realistic results. Basically by extending the pattern from sidewalk to staircase to landing, the overall effect is even more attractive.
Contractors can also make a smooth transition from most of the flat surfaces to steps by basically using thin flex mats or some texture skins in the same pattern as the rigid mats used for stamping the concrete flat surface work. Basically it is made from a pliable urethane, these mats are easily bent to a 90-degree angle to conform to stair risers. There is one other very easy way to imprint granite, slate, and other stone-like textures on small staircases and also some vertical faces is to use small texture rollers.
Expose the aggregate
Along with an exposed-aggregate finish, you are easily able to produce spectacular effects at a reasonable cost. Some types and sizes of decorative things are basically available to achieve some unlimited color and texture differences. Exposed aggregate also contrasts beautifully with plain concrete or other decorative treatments like stamping, staining, and integral coloring. On exterior staircases, an exposed-attractive finish usually offers some additional benefits of being non-skid and resistant to heavy foot traffic and also weather extremes.
Replicate natural cut stone
Textured liners are basically designed for use with step forms making it possible to mold rustic cut-stone profiles in step faces. Most of the step-Liners usually produce an amazing depth of relief of up to 2 1/2 inches. They are usually made from a reusable polyurethane material and are also simply attached to the inside of the riser form before the concrete is poured.
Form fancy edges
Instead of going with a sharp 90-degree step edge, you can also be able to create a variety of curved architectural profiles by using step liners made of polystyrene foam. Suppliers usually include Proline Concrete Tools, Brickform and Butterfield Color.
These types of foam forms adhere to the inside of the formwork and can accommodate various step heights. Combining Walkways With Stairs And Steps
Most of the decorative staircases projects will also require some more steps to transition from one elevation to another, usually at entryways.
Staircases and walkways usually share most of the same basic concrete requirements and also safety considerations. Also, the same methods that are basically used for coloring exterior concrete flatwork which are equally suitable for stairways. The most popular ways also include adding integral color, staining and applying dry-shake color hardener. Most of the contractors also used to connect all these techniques to produce some unique color variations and also marbling effects.
Outdoor Step Height
And if you are planning the look of your concrete staircase, don’t need to sacrifice functionality for a flat surface. The most important dimensions here are the riser height and tread depth. They should be in fractions which will comfortably accommodate the average person’s stride. Also the ratio can differ depending on the application, local building codes also dictate the minimum and maximum riser heights and minimum tread depth.