Let me show you how to build a steel factory? I’ve made a few forks so I have a good idea of how they come together but I’ll give a clue and congratulate Ron Reil and his designs, that’s when I learned how I built them over 12 years ago.
This forge can be used for knife making, metal making, glass making or anything else you can think of that needs to heat things in very hot weather.
I have access to the welder so I was able to put some parts together for this structure but if you don’t have access or don’t know how to heat, the options are you can tie the parts together or be creative and put things together.

How much does a blacksmith cost?
At the cost of propane forge, in theory, you can pay as little or as much as you want propane forge. For the lowest price of $ 50, you can build your DIY forge with trash and pipe. The average price point runs for about $ 400. High-end frames can be over $ 1,000.
If you want to work with metal, there is one thing you have to deal with: You need heat. With it, you can make a solid metal to send to your will. Without it, you will never be able to control this stubborn thing.
Years ago, I was frustrated by my inability to use a hot iron. I fastened the iron together, I fastened it with iron and put it together. But I could not mold it, and the big ropes of the machine kingdom were not allowed to me.
But metal making did not feel any different. My father is a blacksmith, born in the 19th-century iron ore and born in Germany by shipbuilders with ships spanning the shores of the Elbe River and the North Sea. I grew up in rural Connecticut among the Yankee mechanics who could repair anything, make anything, build anything, repair anything – and I had always tried to live up to the standards of adults all my life. It was not difficult at all to decide to take another step, and I learned some basic metalworking skills.
Perhaps it is because our rope smoking industry is declining that a growing number of Americans feel the need to adjust their metal in-home workshops. The Artist-Blacksmith’s Association of North America lists 4,000 hobbyists and professional members.
Some people estimate that there are more blacksmiths in the world today than they did in the 1800s. And you do not have to travel long distances to find many Internet sites offering friendly – or loving – advice from artists, as well as equipment from anvils and handles to wind turbines.
First, I needed a fork. I thought about buying an electric model, but the fact is that I wanted to make my own. So I settled on a design that could be killed in the afternoon using parts purchased from a home center, a stone building, and a car parts shop. The forge will burn coal, rather than gas, to make things easier. And the design had some beauty, at least for myself.
How do you make a homemade forge cheap?
Where there is a need to catch fire and force air to increase the thermal conductivity of metal processes, a forge is the best option to consider. Forge is used to heating metal (either to mold metal or to heat it). In the past, the homemade backbone was a coal-fired fireplace with enough oxygen to raise the temperature.
DIY forge is a type of fireplace or where there is a fireplace. The furnace also helps to burn metals. The heat of the metal makes it easier to beat into shape and increases the strength of the metal. Bringing the metal to a working temperature is the main function of the forge.
The forge mainly contains a hole where the oil burns to produce heat. It is also having a place where the metal is to be exposed to the highest temperature. The place where you create a fire is called a fireplace.
A pipe will be needed to force the air to keep the fire burning. This pipe is called Tuyere. Blowing or blowing also helps to force the air to keep the fire burning. One of the advantages of a good forge is that it should have a suitable ventilation system to maintain an efficient circulation to keep the heat burning.
Centuries ago, this fork was powered by coal, coal, or coke. This oil burns to produce heat that would bring the metals to their soft state. Over time, the fuel used to power the fodder varies, but the composition of the folge has remained the same.
Nowadays, people have found a way to get the same results using electricity or gas. If you are looking for something cheaper, easier to use, and used for basic construction projects, try a custom-made forge.
The key elements of the process are:
- Chisel
- Hammer
- Firewood
- Heat
- Cardboard
How to make Propane Forge:
This forge can be used for knife making, metal making, glass making or anything else you can think of that needs to heat things in very hot weather.
I have access to a welder so I was able to put some parts together for this structure but if you don’t have access or don’t know how to burn it, the option is to put those parts together or be creative and put things together.
Let’s get started
Step 1. Materials and tools used
I bought kaowool and Refractory from nearby the rest I found locally at the hardware store.
Note about the ITC-100 refractory used to cover kaowool, it works much better than any other cement/mortar similar to the identification I have used in previous forges. I can see that it heats up faster and uses less fuel than the previous build using a standard firewire (don’t remember the type). If you have extra money, spend it on the ITC-100.
Items:
- Air Tank or freon tank or propane tank or metal tube (container)
- Kaowool (pottery)
- Kaowool Board
- Firewood
- The ITC-100 is a counter or other form of retaliation made with a brush.
- Great heat cement
- Top BBQ paint
- A steel tube or steel pipe the size of a propane burner
- A piece of 14 gauge or similar hot metal
- 1/8 “x 3/4” flat metal piece
- A piece of 1 “square metal piece
- 2 “x 10-32 bolts
- 3/4 “rough screw
- Here is a list of the main tools used, some of which may not be listed.
Tools:
- A mini-grinder with a small kerf cutting disk
- Files
- Driving
- 10-32 tap
- putty knife
- high-quality respirator
- discarded gloves
- machine
- welder or propane binding torch
- 1 “paintbrush
Step 2. Body Building
The growing body is a portable air tank. But you can use anything similar, such as used Freon or propane tank. I used a metal pipe I found in the yard of the lost items which worked very well.
The air tank I use has a stand that is designed to keep it from falling over so this saves me a step by step otherwise I would have had to put my feet up. I will leave it to your imagination to add feet to any tank or tube you use, suggestions for other large bolts, or weld to other lubricants.
I used a well-fitting pot to find the size of the open space. Compass can also be used. I cut the ends of both ends of the tank using a small kerf cutting disk in a small grinder.
Step 3. Burner Mounting Tube
To mount the pipe nipple welding machine was touched and burned under the counterfeit.
The placement of the tube was above the badge and was placed in a corner. The hole was marked and cut, I didn’t have a hole that saw the right size so I dug holes around the circle and used a Dremel with a cutting disk to cut it.
After that, the nipple of the pipe was touched using a 10-32 cord pump. The bolts will hold the propane ignition in place of the lift.
The nipple was then heated in the tank, if you do not have access to the welder, another option is that the tube can be driven into the tank. If you can find a fencing flange of the right size, it can be attached to a tank.
Step 4. Forge Floor
The bottom of the frame needs to be installed with a firebrick. A firebrick is durable and can be replaced if you make any amount of welding forge as the flux will eat away at the brick.
Bricks were cut to fit the bottom of the tank and one brick was cut into pieces 1 inch wide as bricks to grow bricks from the bottom of the tank. Look at the picture.
A wet saw was used, some methods used a sledgehammer and a hammer but the bricks I used were too weak to cut that way.
The bricks were laid and then glued together using a very hot stove cement.
Step 5. Ceramic Blanket and Board
The main components of forge and insulation are ceramic cloth and board, which goes by the names of brands like Kaowool. The dress can be purchased in different sizes, I recommend getting 1 “thicker than the larger as it is easier to work with. In this design, 2 layers of 1” will be used.
This board is a sturdy ceramic board and will be used for openings and the back wall of the badge, size 1 “.
Important! When working with these ceramics, wear a good quality respirator and clean any strands after cutting. You need to keep these strong fibers out of your lungs!
Step.6 Installing Ceramic Wool
Measure the circumference of the frame and cut the fabric to size. It is best to cut it short so that you can reduce it. To cut ceramic wool use a sharp working knife, very similar to working with household appliances.
Two layers were placed and the bottom of the fire bricks was placed one between the spaces.
The opening of the propane heater was also turned on and off.
Step 7. Back Wall
The back wall is an exit port and can also allow long pieces of metal to work in the barn. Made of the ceramic board.
To make a template a piece of plastic was pulled over the opening followed. It was then transferred to a piece of foam board or cardboard and followed by a ceramic board. A cutting knife was used to cut the board.
The fabric on the forge is compact so the ceramic back wall was kept in place by collision.
Step 8. Pre-opening
To keep the inside of the fork accessible it was fitted with a removable front opening. At the body of the forge, a piece of 1 “x1” square tube had holes drilled holes for 10-32 bolts. After that, the square cell was burned in the body of the fork, and the liver transplant could be changed.
The front bracket “U” was designed with a 14-piece steel gauge, the template was provided free of charge, some holes were drilled by attaching the board. A flat piece of metal was bent and burned in brackets for “U”.
A piece of ceramic board was cut that was larger than the opening of the kraal but the size of the opening is still up to you as it needs to be large enough for me to get the lumps inside and out. It was attached to the “U” brackets using rigid screws.
The “U” brackets are held in place by a flat metal tube in a square tube with taped bolts.
Step 9. Resistant membrane
The ceramic cloth and board need to be stabilized so that the fibers do not get into the air when the forge is working. There are a few options for the resistant membrane, I use ITC-100 HT which looks like cement/mud, but can withstand extremely high temperatures. It needs to be mixed with water so it acts like a slide that can be used with a paintbrush. Consistency should be similar to batter pancake batter.
Slightly stripped inside and out of the frame, just make sure to cover all exposed areas of ceramic fiber.
Other rewind tools can be used and the app will be the same.
Allow Refractory to dry before using the forge.
Step 10. Misc Pic
Paint the façade with high-temperature paint, especially in areas where there is open metal.
Here are some forge images with included checklists.
Insert the propane heater into a fake opening and securely hold the area with bolts. You want heat so the microphone washes inside the fraud wall.
Step 11. Forge operation
Put on safety glasses and have a fire extinguisher nearby. To light, the forge, use a long BBQ lighter and place the flame near the heating pipe inside the fork. Open the propane slightly and the forge should burn. Leave the forge with low power.
When Refractory is dry, it needs treatment. Do not use the forge with full force until the refractory is cured Start the forge at low heat for 15-20 minutes to allow the ceramic fibers and glossy membrane to “set”
The forge is ready for use. Adjust the temperature of the propane burner and check to make sure everything is working properly.
How to Make a Handmade Forge
1.Merge Parts:
You can buy these parts or get them. If you have a small budget, it is best to get them, which will not be difficult to do. Give yourself plenty of time to get everything you need.
Finding any part is not a requirement for you but finding the right piece for the job. Collecting forge parts is an easy task, but it requires expertise and experience.
In this case, the two most important parts you need to do to make a DIY forge made of gas are the fire extinguisher and the heater. Some parts can be improved.
2.Build a Forge Body:
Building a homemade forge is a straightforward process but involves some delicate steps. These steps include merging all other components. Connecting the pieces correctly requires expertise.
Having prior knowledge of the forge makes it easy to integrate and set the forge the way it should be.
Quick Steps:
- Find the right fire bricks.
- Cut the firewood into two rectangular shapes of equal size. Each brick will form the surface of the head.
- Cut rectangular templates that will form a forge hole and trace them to the fire bricks.
- Use a hammer and chisel to cut a hole in the fire structures. Note that this hole will create space for your fender and its size often depends on the brick.
- Take your time to beat well and carefully. Although it is not necessary to have a complete hole, all you need is close to half a circle on each brick that provides enough space.
Note: If you are using a container in a fireplace, you will need an insulator. Using active and long-lasting isolation reduces the energy lost in the environment. The type of input you use is also very dependent.
It is important because the equipment (fuel) installed in the cage will use its full potential if you reduce the heat loss rate, and that will be an excellent protection function.
However, you can still use other artificial forms. Depending on your budget, you have two options: fire bricks or a high-quality ceramic fiber cover.
Two options include;
- Firewood is very common. You can get them at a lower price, but they don’t have the same amount of stability and durability. They will eventually confuse you.
- The ceramic fiber coating has a great ability to retain heat, durability, and durability compared to firewood. They are the product of solid measures, thus making them more expensive.
The choice between the two depends on the circumstances surrounding the situation at present. In addition to the selected options, you layer the inner body of the forge with it.
3.Drilling:
Drilling is another important step when making a homemade forge. The drill should help you monitor the temperature from the temperature to the center of the forge. It will act as an entry hole that allows you to provide the required amount of heat.
Quick Steps
- Mark the firebrick center where you want to do the drill and start drilling accordingly.
- Keep the ball until you have a complete entry hole.
4.Set burners:
The use of heaters is not a big issue here. You can use as many heaters as you like. The sum of the particles is to burn metals or objects in trouble. The number of burners that provide power to the forge determines the temperature range at different times.
For this, you need a banner that will go into the air space and supply gas directly to the center of the fork. You can use one or two coolers, depending on the size of the hole and the drill number.
Using one burner will take a lot of time to install about 20000 ℃, but if you use two burners, it will take less time. This concept also applies to the next number of burners.
Pro tip
Since the budget is critical, you can build a small forge using a flashlight of propane bottles. Your burner setup system is more complicated, more expensive to accomplish.
5.Touch to end
Finishing touches will help you improve your building process. Start by inventing a way to keep your unity together and avoid splitting up. As long as you tie the bricks together properly, they will not break apart even if they crack later.
Quick Steps
- Install two small fire bricks to improve separation.
- One of the thin bricks will be at the top and the other at the bottom.
- Use the phone to connect them. Steel wires are usually the best. You can use ties about 6-10 in diameter and a minimum of two ties in length.
- Strengthen them tight enough to keep them together, even if cracks occur.
- You can install a stand to keep the torch upright.
- Make sure the propane pipe is properly covered to prevent accidental combustion.
6.Make Ventilation
Breathing is also an important step to take care of. Respiration is important both in the structure and function of the metal. There are two types of breathing that you should be aware of when making your forge.
The first is for the mechanic’s benefit and the other is for the metalworker. Air should be made in the barn so that it does not choke the fire.
There should be enough air in the fire retardant belt. The fire needs oxygen to prevent burns, so the air supplied should be monitored using proper ventilation.
Another type of ventilation is air in the room. Heat involves a complete and imperfect fire. The latter results in carbon monoxide, and the first results in carbon dioxide.
Carbon monoxide is a very dangerous gas as it can kill an adult within two minutes. Therefore, low ventilation in the room should be considered necessary as well as ventilation of the fork.
Can you create your forge?
The knife is made of a single steel bar, heated and then hammered in. The design of the knife scaffolding includes a heat-and-burn box to insert heat, which can be done in a variety of ways, although propane-powered forge is often the most popular method.
To do so, you will need a fire brick or something that can act as a fraud box. You will also need box holders together and a propane heat flashlight. While making your knife is not necessary to get the latest designs with custom knives, it can be a fun project for knife lovers.
Building a Mini-Forge
The best place to start is with a full look at the mini-forge building, as explained by The Geek Pub. The first step is to find a fire brick and cut it in half. Take one half and drill a two-inch-wide hole in the center that will serve as a fire chamber. Drill a small hole (5 / 16th) on one side that connects to a large hole. The rest is left as a solid brick.
The aluminum angles are then cut into four, six-inch pieces with 5 / 16th holes drilled at each end. Using bolts, washers, and nuts to protect them, use aluminum angles to connect the two pieces of fire brick, making sure that the small side hole remains unsealed.
Once the mini-forge is securely fastened, a pipe from the propane torch can be inserted into a side hole, heating the central chamber. Using cones, the metal can be heated within minutes of room. You will then need a hammer and a fork to turn the metal into the desired shape.
Coal-Burning Forge
At Mechanical Mechanics, they build a larger fog using two stainless steel sinks. A person is filled with water to form a fire extinguisher. One is furnished with cement for the furnace, and then with fire bricks. Then they built a chimney with a stove. You can find details here.
They used metal coal shipped from Pennsylvania to heat the fireplace, heating the fire chamber. They made the hood of the oven using a stainless steel frame that was purchased at a home facility.
Bigger Forge
As an example of a large frame, Popular Science builds one using lighted bricks and a metal frame to support it and its contents. The foam is larger and has clearer sulfur that includes a wider, longer pipe. Forge images are here, as well as for instructions for assembling them (there are a few options).
This gives you an idea of how to create your scam. A mini-forge is probably the best place to start, to see if you enjoy working and working with fage. If you do, then making a big knife scam would be in your morning.
Do blacksmiths make a lot of money?
Metalworkers working in the steel industry built about $ 38,450 in 2017. On the other hand, welders, cutters, solders, and brazers make about $ 40,240. On the other hand, the annual salary of self-employed metalworkers can vary greatly.
What is legislation?
Metalworking refers to the act or process of building and constructing metal using heat and tools. Since civilization discovered that steel could be built, there was at least one person of steel in almost every city in the world. This method of constructing metal has made it much easier to build better weapons, tools, and building materials.
According to the term “blacksmith”, most people think of pictures of old Western men beating horse horses. Metalworkers made not only steel horseshoes, but also designed and repaired weapons, tools, nails, screens, fences, and a variety of other things.
The Industrial Revolution, however, virtually ended trade with steelmakers. New machines, such as screw-cutting machines, can produce metal objects much faster and cheaper than steelmakers could. There were other tasks that machines could not do, however, such as shoemakers, and although the number of blacksmiths in the literature declined, it has not completely disappeared. Today, metalworking is more of a necessity, and many modern craftsmen consider themselves to be craftsmen.
Normal Work Environment
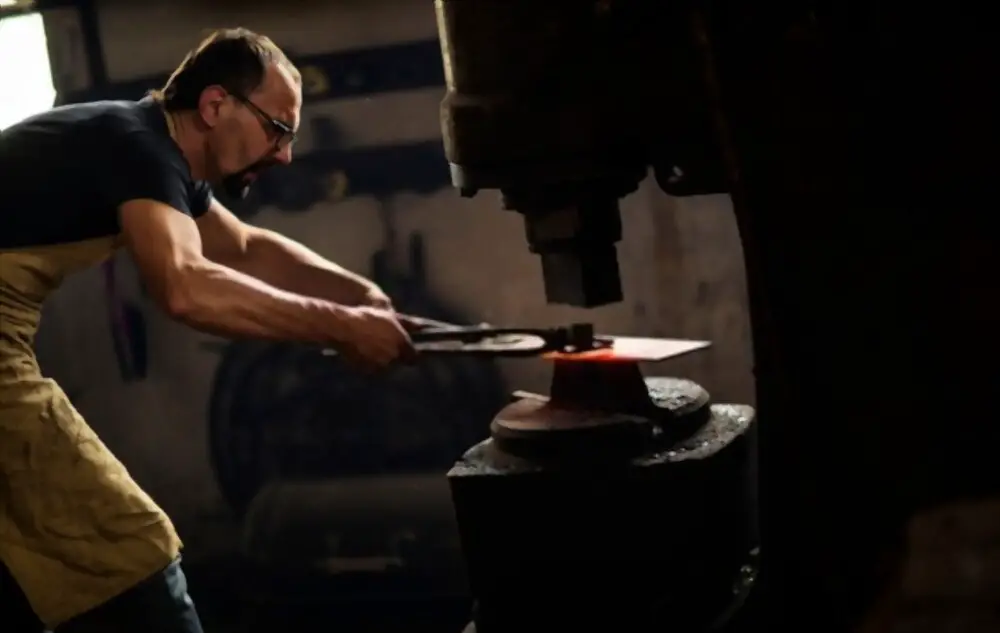
When these metals reach a certain temperature, they begin to melt or melt. To make metal, blacksmiths used cylinders to heat the furnace or to heat it until it was hot. Although it is still legally strong at this time, this makes the metal more flexible and more flexible.
While the metal is easy to handle, the blacksmith will use a variety of tools to shape and shape the metal. He can place a red hot iron on an anvil or metal bench, for example, and rub it with a hammer. He can use several other tools to twist, twist, pull or puncture holes. The process of heating and forming the metal is repeated several times until the metal has reached the required level.
Depending on the metalwork, various practical or artistic objects can be built during the process. Some metalworkers make tools, horseshoes, or decorative fences, for example. Some metal makers may simply make decorative metal objects or sculptures.
Requirements for Blacksmith Education & Training
Many modern metalworkers start their careers as a weekend hobby. They are educating themselves, and they have not received formal education. Formal education is not always necessary for a successful metalworking business. Metalworkers who have a formal education, however, are more likely to have successful jobs and are more likely to be able to pay higher wages.
Some technical and commercial schools may offer metalworking degree programs. While earning these degrees, metal makers often learn a variety of different skills, such as metal welding and welding. People who are looking to become metal builders should also consider a work-study program or a travel plan. These types of programs allow students to gain experience in metalworking while working under metalworkers.
Metal Salary and Job Outlook:
Salary
The average annual salary of steel will vary, depending on how talented you are, where you are, and how well you work. The area will also generally contribute to the earnings of the metal; some areas have a high demand for metalworkers, so they are often overcharged.
Metalworkers working in the steel industry built about $ 38,450 in 2017. On the other hand, welders, cutters, solders, and brazers make about $ 40,240. On the other hand, the annual salary of self-employed metalworkers can vary greatly. According to The American Farrier’s Journal, only part-time farriers can generate up to $ 20,000 a year. Decorative metal manufacturers can make a living, depending on their skills and the demand for their creations, but there is no set data on the annual salary of these types of craftsmen.
Work Vision
Modern steel will be able to find work by steelmakers, manufacturers, and manufacturers. Most blacksmiths, however, work as decorative metal builders or farriers. Farriers are experts who take care of the horses’ feet. This doesn’t just involve creating horses and horses for shoes, though. Farriers must also be able to cut horse hooves and have a basic understanding of horse foot life. Decorative metalworkers, on the other hand, work in small shops.
Most of the time, these stores will be managed and operated by one or two experienced mechanics. These types of metal makers often create objects for decorative purposes, such as sculptures, but some of their works may also help. For example, metal makers can make handmade pokers in handmade fireplaces, addresses, or weathervanes.
Beneficial Organizations, Communities, and Structures
- Instrument Artist Association
- California Blacksmith Association
- Guild of Metalsmiths
How to Make a Metal Forge
Metalworkers have heated the metal to make conditions for a hundred years, using fuels such as wood, coal, or bituminous coal to heat their metal. For today’s hobbyists, a simple fire pit with sprays will provide enough fire temperatures to allow for small construction projects.
If you want to work with metal, there is one thing you have to deal with: You need heat. With it, you can make a solid metal to send to your will. Without it, you will never be able to control this stubborn thing.
Years ago, I was frustrated by my inability to use a hot iron. I fastened the iron together, I fastened it with iron and put it together. But I could not mold it, and the big ropes of the machine kingdom were not allowed to me.
But metal making did not feel any different. My father is a blacksmith, born in the 19th-century iron ore and born in Germany by shipbuilders with ships spanning the shores of the Elbe River and the North Sea. I grew up in rural Connecticut among the Yankee mechanics who could repair anything, make anything, build anything, repair anything – and I had always tried to live up to the standards of adults all my life. It was not difficult at all to decide to take another step, and I learned some basic metalworking skills.
Building a Forge
Perhaps it is because our rope smoking industry is declining that a growing number of Americans feel the need to adjust their metal in-home workshops. The Artist-Blacksmith’s Association of North America lists 4,000 hobbyists and professional members. Some people estimate that there are more blacksmiths in the world today than they did in the 1800s. And you do not have to travel long distances to find many Internet sites offering friendly – or loving – advice from artists, as well as equipment from anvils and handles to wind turbines.
First, I needed a fork. I thought about buying an electric model, but the fact is that I wanted to make my own. So I settled on a design that could be killed in the afternoon using parts purchased from a home center, a stone building, and a car parts shop. The forge will burn coal, rather than gas, to make things easier. And the design had some beauty, at least for myself. It was based on programs published in Popular Mechanics in July 1941.
I enlisted the help of Mike Allen, a former automotive engineer at Popular Mechanics and a metalworker. He looked at the old plans and said, “Sure, we can build this thing.” Within a few days, Mike’s house and shop behind the hustle and bustle became a nightmare as the UPS boy quickly unveiled a cover of 275 tools, tools, building materials, and four-pound steel boxes shipped from Pennsylvania.
When the goods arrived, we started working on building a forge, starting with its stand. I cut out the metal parts and gave them to Mike, who put them on the floor of the store, assembled them, and temporarily fitted them with metal strips.
At the table, he opened his mask and handed me a shotgun: “You take it from here.” I slapped the mask and picked up where she had left off. While I was working, Mike leaned over my shoulder and finished the advice.
“Get more metal in the right places,” he said. “You will get a lot of crashes; it will reduce your flow speed and your ongoing electrode.” When I found it difficult to see with the glitter and smoke, he said, “Look at it. Look at the weld mud, not the arc.” I learned more about the heat in that half hour than I had in years of self-deception.
A few Piercing Tools You Will Need
Forge: A stainless steel sink serves as the center of our metal set. One basin is filled with water, and he builds a fire tank. One is filled with cement for the furnace, and it is covered with fire bricks that have been placed in place without the cement. The floor metal cover built over the immersion ditch forms a tuyère, a harbor where an air bubble (provided by a store vacuum) enters the coal bed from below.
Refractory Cement, Brick: Rutland Fire Clay Black Furnace Cement was thrown into the sink to protect it. Firebrick is sold in stone shops.
Forge Fuel: The Penn Keystone Coal sells bituminous and anthracite fire coals in 50-pound bags protected by a cardboard box. One pound gives an amazing 14,373 Btu.
Hood and Vent: Twenty-gauge and 5-in steel sheet. The molded stove forms a hood and vent. Building materials are often available in-home facilities.