Install a fibreglass shower stall with an assembly of the drain over a concrete floor so that leaks could be prevented. The shower drainpipe is run under the concrete.
How do you install a shower tray on a concrete floor?
Run a drainpipe under the concrete floor
A 2-in. shower drain P trap is located under the concrete slab is needed by a shower.
The process to install fibreglass base of a shower is a perfect option if you want to install a basement shower stalls over a concrete floor. For this, there should be a shower drain rough in with a pipe rising a few inches above the floor. You need to break through the concrete and then go with the installation of a new shower stall line.
If a pipe is suspected to be scratched, all you need to do is contact the plumber or the contractor who installed it to check and confirm from him. The basement shower drains are 2-inch pipes. It should be perfectly aligned with the hole on the shower bay’s bottom. The location of the stud walls can be presumed by this position.
You need to check the position of the existing 2-in.shower Drain pipe. If the pipe is not at the desired location, you need to break up the concrete and perform the plumbing of the drain.
You need to ensure that the pipe of the drain has risen at least an inch above the concrete. If the pipe is short and not up to the expectations, you need to extend the concrete by breaking it. Also, space of 1-½ inch is essential between the pipe and the concrete. If the area is not present around the pipe, you can chisel around the concrete over the pipe.
Tip-
You need to ensure that a single piece shower stall can be fixed into your new bathroom space. It is importantl that before framing the walls, you need to move and shift the entire unit into the room. If getting through doors is a challenge, look at multi-piece units that will fit through them more easily.
Mount the assembly of the drain
To provide leak-proof seals, the assembly gets attached firmly to the pipe and clamps to the edge of the shower base.
After framing the shower walls to suit the shower stall, you need to shower stall on its back and then install shower in the basement. You should use the No-Caulk Shower Drain which is a leakproof shower drain assembly.
The following steps need to be followed to connect the shower to the drain-
- Roll out a coil of plumber’s putty and wrap it under the drain basket flange.
- Hold the shower drain basket in place in the hole of the shower stall. The next step is to slide on the washers and thread on the setting ring. Tighten the ring until it is in place, with the help of big slip-joint pliers. The shower basket should not be able to be moved by hand. The putty from the plumber will be squeezed out.
- Once you have moved the shower stall out of the way, cut the drainpipe to length. Also, you need to ensure that the pipe is cut squarely.
- The shower stall and the basket assembly are set back over the pipe. Slide the caulking gasket over the pipe and push it all the way down until it touches the basket’s lip at the bottom. You may need to use a hammer and a small piece of wood to tap this gasket into place.
- To compress the caulking gasket and seal the pipe, thread on the caulking nut and tighten it tightly. Make use of the slotted bar tool included with the assembly of the drain.
- Hand-tighten the bar by inserting the flat blade of a screwdriver into the slot.
- Attach the drain cover with a snap.
Required Tools
The following tools are important for a DIY installation of shower drain project lined up to save time-
- Hacksaw
- Hammer
- Slip joint pliers
Required Materials
To keep all your materials ready for a shower stall installation and basement showers, here is a list-
- Drain assembly
- Plumber’s putty
Do you need a shower pan liner on the concrete floor?
It must be lined, else it will seep into the slab and studding. The liner keeps the walls surrounding the pan dry, which is why it usually extends at least 3″ above the pan behind the tile and backer material. Moisture seeps through the cracks in the wall tile and is finally absorbed by the liner.
Do I need mortar under the shower pan?
The answer to this question is Yes. Mortar is recommended to be used under all kinds of shower pans.
How do you install an oatey shower pan on a concrete floor?
Step 1-
A wooden subfloor and a half-inch diameter hole should be cut in the centre of a base. The drain should be disassembled so you have access to the individual parts .The base of the drain should be placed over the hole so the throat of the drain penetrates the hole and the flange of the drain rests on the subfloor.
Step 2-
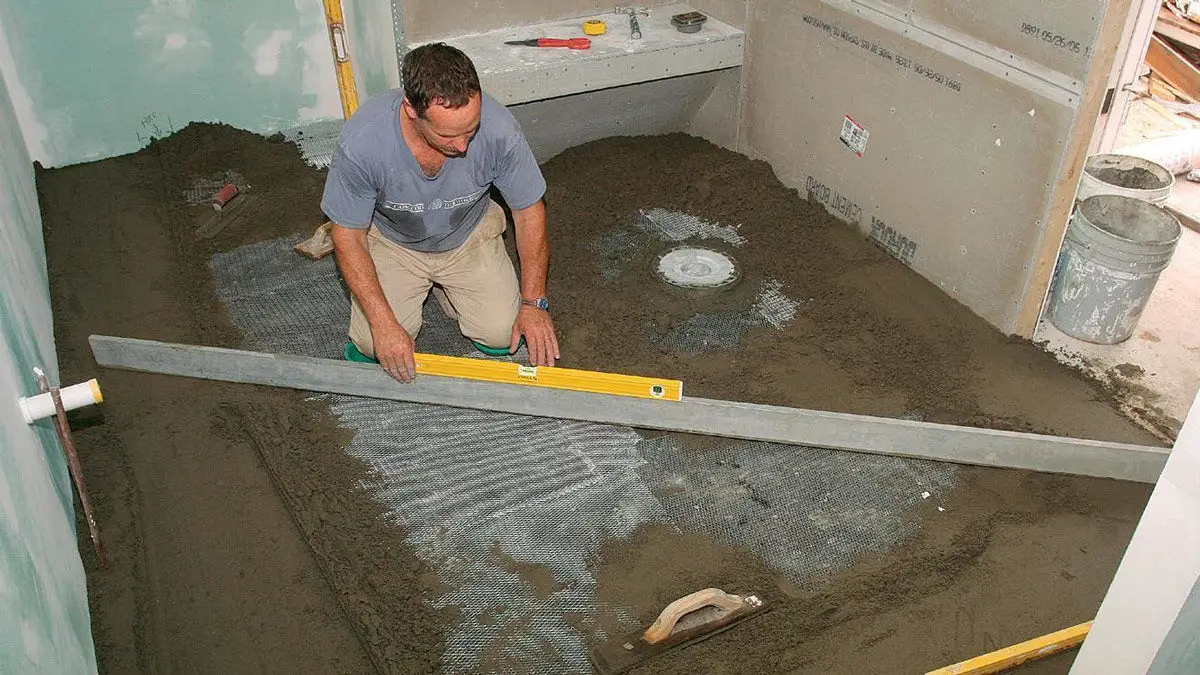
Before going forward with the installation, the opening of the base needs to be protected from the debris. This can be done by covering it with duct tape or by inserting a mechanical test plug in the drain. Begin by applying the Portland Sand cement mixture bed over a subfloor pitched at a ¼ inch per foot slope or 2% grade. This slope originate at the walls of the shower and terminate at the drain base. Take care not to apply cement over the drain base. Once this is complete, the sloped mortar bed should be flushed with the top surface of the drain base.
Step 3-
After allowing the mortar bed to cure, you need to determine the dimensional requirements of your pan liner. Pan liners should be cut to a size that is large enough to cover the entire floor. Go up to the walls to a height that is at least 2 inches. You can see the liner to see if area is specifically too short. A seem may be needed if the area of the shower exceeds the maximum allowable coverage of the Oatey pan liner.
Step 4-
Before the pan liner gets installed, the drain needs to be uncovered. A quarter-inch to ⅜ inch bead of 100% silicon caulk should be applied around the upper surface of the base of the drain one inch from the edge. This will seal the lower surface of a liner to the base of the drain to ensure that the water cannot flow under the pan liner and damage the subfloor below at the discretion of the installer. An adhesive can be sued to bond the pan liner to the sloped mortar bed below using an approved adhesive for PVC membrane. Contact Oatey technical support from our list of approved adhesives.
Step 5-
The pan liner should then be worked from the body of the drain to the sidewalls of the shower and curb threshold so that it lays entirely flat on the floor surface. The liner should be folded in the corners of the shower and then nailed or stapled into places. Fasteners should be used at least 2 inches above the level of the curve and the liner should not be penetrated anywhere below the flood rim of the shower. Secure the rest of the liner in the same fashion.
Step 6-
For outside corners and curbs where it is necessary that you cut the liner.
Step 7-
Locate hole of the drain and cut out the diameter of the same hole. Place the clamping ring over the liner and turn it counterclockwise so it locks into place. Tighten the bolts so they become snug.
Step 8-
The entire shower stall needs to be water tested to make sure there are no leaks in the installation. This can be done by inserting a test plug and then filling the shower to just below the flood level.