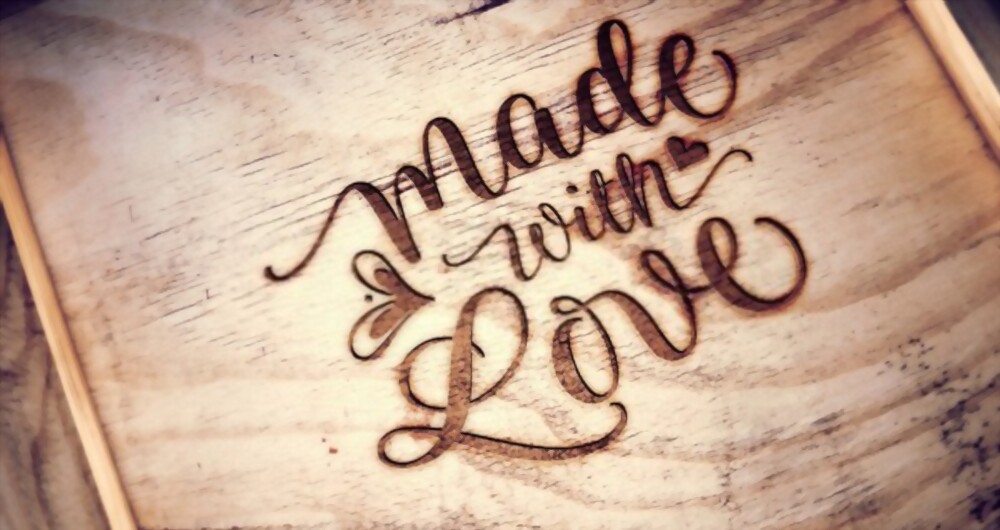
Making one-of-a-kind pieces and gifts has become a common hobby. Many projects will benefit from DIY wood engraving tools. Wooden designs can be complex and deep, or they can be shallow and wispy. Wood engraving is a common choice for décor and customized keepsakes because of the variety of styles it can produce.
Ways to Engrave On Wood
Engraving wood has been practiced for thousands of years. Originally, pictures and letters were etched on wood with a sharp hand tool to commemorate a significant event or aid in disseminating knowledge to a large community of people. In the mid-nineteenth century, it became a popular pastime.
Motorized tools revolutionized the craft in the twentieth century, making DIY wood etching a more accessible and common hobby.
How do you engrave writing on wood?
Each tool for carving letters onto wood creates a unique look for the piece you’ll create. They all necessitate distinct skill sets.
- Chip carving: To carve divots in the wood, use a sharp chisel with two angled lines cut to a center point. You have a lot of influence over the letters’ depth, and no two designs are alike. Gouges will be used to form and smooth out the hand-carved letters and incorporate precise points and other sharp edges.
- Dremel: These whirring tools can create deep, delicate grooves in nearly any form of wood.
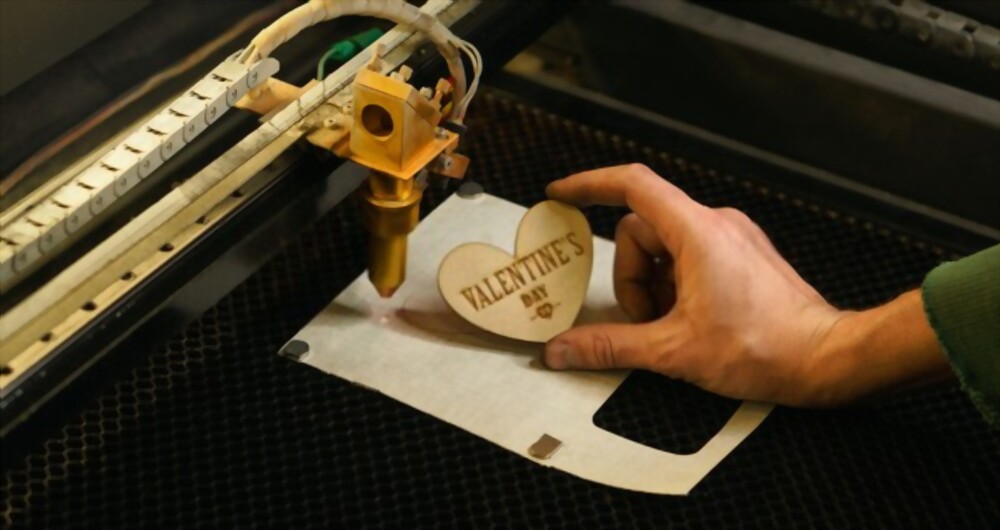
- Lasers: Etching has become a precise art form for home décor and sculpture thanks to these devices. They may also be used to make small plaques on a cutting board representing a family crest, a personal accomplishment, or just a last name.
- Wood-burner: A pen-shaped wood burner gives wood burner engraving on planks of wood a distinct shape and color and is simple to use for first-time engravers. The woodburning pen is designed to make your job as straightforward as possible. Allow the pen to do the job by applying just enough pressure to prevent it from slipping across the surface or gouging the softwood.
Professional wood etching
You would want to employ a professional laser company to design and craft your masterpiece if you want a plaque with dates and other fine details. Today’s machines can make deep, delicate marks, resulting in stunning pieces that you or the recipient may want to keep for generations.

Best wood for etching
Since hardwoods are more difficult to burn, softwoods are the best to deal with. However, the color of the wood base you use will determine the base color that will display in your wood etching. Dark woods can mask delicate etching work, while lighter woods produce a dark and deep burn resistance to splitting and provides a striking contrast for design.
The amount of resin or sap in the wood determines whether it is light or dark. You’ll want to use woods with a high resin content for darker-burn photos. There are some of them:
- Cherry
- Alder
- Oak
- Ash
- Basswood
- Walnut
- mahogany
Woods with a low resin content will produce wisps of images for a more abstract design when used for lighter-burn images. Woods with a lower resin content include:
- White pine
- Fir
- Juniper
- Pine
- Cedar
- Spruce
- Redwood
- Yew
- Larch
Carving Letters in wood
The sharp edges created by a hand tool give the engraved letters you produce a distinct look from those created by more modern handheld tools.
You can download a wide variety of letters from the internet. The more work you have to do to get the precise template to translate well to the wood, the smaller the letter will be. Trace the design onto the wood using the letter-carving templates you created.
It doesn’t matter what tool you use; getting the right angle is crucial for a clean line. Approach the wood from a consistent 20 to 30-degree angle. This will bite into the wood rather than skipping over it.
What is the best way to engrave wood?
Using a rotary tool with advanced engraving bits is the simplest and most potent way to engrave wood. Hand engraving is best achieved using chisels and gouges. For those who seek perfection in their engravings, laser engraving machines can provide accurate results.
How do you engrave letters to wood by hand?
Carving letters into wood is an excellent art activity for creating customized signs and decorations. All you need are a few tools and a place to work if you want to start wood carving. You can either carve the letters by hand with a chisel or use a handheld rotary tool to operate faster after you’ve put them on the wood.
- Hold a right-angle chisel against your wood- A V-shaped end on a right-angle chisel allows you to cut larger pieces of wood. So that the V-shape is facing up, place your thumb on the ferrule or the base of the chisel blade. Along the outline of your message, keep the point at the bottom of the V.
- Right-angle chisels are available at most hardware stores.
- Chisels come in a variety of widths, so choose one that matches the width of your outlines.
If you’re carving a block letter, keep your chisel’s point just inside the outline. Place the chisel directly on your outline if you want a beveled point.
- Push and tilt the chisel forward to carve into the wood- Lightly advance the chisel around your outline while tilting the handle up. The blade will begin to carve into the wood and follow the path. To remove the wood, start with a shallow cut and carefully follow your outline. Tilt the blade handle down to break the piece off as you reach the edge of your outline.
- If you put your other hand in front of the chisel blade and it slips, you might get hurt.
- Use the edge of a flat chisel to break off smaller pieces of wood- A flat chisel is a tool with a smooth, sharp edge that can be used to make precise cuts. Tilt your chisel at the angle you want to make your cut, with the beveled edge facing up. Push the edge of the knife into the wood until you hit the desired depth. So the wood breaks off quickly, work the chisel blade against the areas you already cut with your right-angle chisel.
- Between each cut, wipe away any wood shavings that might have gotten in the way.
- Straight edges and vertical cuts are easy to achieve with flat chisels.
- Hit the end of the chisel with a mallet if the wood is too hard to chisel by hand- If you’re having trouble pushing your chisel through the wood, gently hit the chisel’s handle with a mallet with your other hand. If you strike the mallet too hard, you risk gouging the wood you’re using. Continue striking the chisel until you can quickly carve through the wood once more.
- If you’re hesitant to use a mallet, try striking the handle with your palm first.
- Some hardwoods, such as white oak, require the use of a mallet to carve.
- Keep carving out your letter until it’s finished- With your right-angle or flat chisel, continue chiseling your letters. Maintain a clean finish on your wood by staying within your outlines. You can carve the wood as deep as you like, but cutting through more than 34% of its thickness can cause it to weaken.
- Slowly navigate curves to maintain the most power.
- For more precise cuts and shaping, use your right-angle chisel, and for larger pieces of wood, use your flat chisel.
- Sand the edges to remove any leftover wood- After you’ve finished carving your wood, smooth your chisel cuts with 80- or 100-grit sandpaper. When you sand, wipe the sawdust off the wood to see what areas you need to focus on. Work your way around all of the edges until they’re entirely smooth.
- If your letters aren’t buried deep in the wood, sanding them too much can
- result in a loss of detail.
- When sanding, make sure to get rid of any pencil or carbon traces.
Can you use a Dremel to engrave wood?
Engraved wood is a distinct art style. And Dremel has gone out of their way to make the experience much less difficult for their customers. Engraving wood has never been easier than with their high-speed rotary cutting heads and one of their simple rotary tools. Various engraving cutters are available in various shapes and sizes, allowing you to customize your work further.
Step 1– With carbon paper and a pencil, transfer the template you want to engrave into the wood onto the wood.
Step 2– Place the desired engraving accessory into the Dremel tool’s collet after loosening the collet. With the screw, tighten the collet.
Step 3– Connect the tool to a power source and set the engraving speed to the desired level (6, 8, or 10 depending on the wood hardness and engraving cutter; see the Speed Settings page in the owner’s manual that came with your tool or downloads a copy using the link below).
Step 4– Complete the engraving by following the traced pattern on the wood. As you go, switch cutting heads to create different details in the wood.
Step 5– When you’re done using the tool, wipe the dust off of it. Clean up the sawdust with a vacuum.